I may write a whole lot about food over at my other blog (It Ain't Meat, Babe), but I don't get much of a chance to write about how that food gets eaten. I usually leave that up to my readers. But personally, despite spending most of my time thinking about how the food gets prepared, I also have some systems in place for how it gets eaten.
First let me tell you that my day job necessitates a lot of travel. A LOT! I am rarely in my office. Some days I am working in rural communities two hours out of the city. Some days I'm in some far-flung suburb. Occasionally I am lucky enough to be working somewhere within walking or biking distance. As a result of this, I've become very good at packing a lunch. I know it's usually the most cost-effective and environmentally friendly thing to do. Not to mention the fact that vegan food is hard to come by in most places, especially if I'm looking for a quick lunch to eat while I'm traveling.
So I pack my lunch. But what do I pack it in?
Over my many years of lunch-bringing, I've figured out how to make everything involved with my lunch reusable. Lots of schools have garbage-less lunch programs in place, I figured why not have a one-woman garbage-less lunch policy in place for myself?
My first step was to find some glass containers with good lids. I try to use as little plastic as possible, period. Although we have no microwave at home, I do sometimes use one when I'm lunching elsewhere and I am loathe to microwave any of my food in a plastic container. (Why fuss around trying to figure out if one container or another is "microwave safe" when you can just avoid the potential danger all together?)
So far, in our house, we've tried three different kinds of glass containers (all have plastic lids). The little round one in the photo above is made by Anchor. We have larger versions as well and I have to say that they are the clear winners. They are union-made in the United States and they are reasonably priced, widely available, and oven safe. The lids fit tightly, even after a few dishwasher washings. They aren't completely leak-proof, but they aren't too bad if the food inside isn't too liquidy.
The other container in the photo is made by Pyrex and it is my least favourite of our three varieties. The sizes are kind of awkward, and the lids are freakishly tight at first and then loosen a lot when washed in the dishwasher. Though I must say, looking at their website it seems they've introduced a line of containers with "No-Leak Lids". I'd be anxious to give those a try.
My other favourite is the Glasslock containers (not pictured). The lids are almost completely leak-proof (why "almost"? Well, let's just say my purse smells a bit more like curried cauliflower than I'd like it too. However, my boss brings soup in one of these containers everyday and her briefcase is unscathed, so I may just have a slightly wonky specimen.) These are a little heavier than the Anchor containers and some of them are labelled "not safe for oven". They are also made in the U.S.A.
The other lunch item I never leave home without is my homemade cutlery holder. If you can sew in a straight line, you can make one of these. All it is, is a rectangle of fabric, folded over on one end with stitches making sections of the fork, knife, spoon, and napkin. I added a ribbon to one end so that after I fold down the top flap and roll it up, I can tie it closed. Some spare cutlery from a secondhand store and a cute cotton napkin complete the project. It doubles as a placemat if you want to be fancy. And at the end of the week you can throw it in the washer. I like it so much I'm slowly making similar ones for all my coworkers.
And last, but not least, (though totally unrelated to lunches, at least right now) I wanted to give you all a garden update. You may remember my last post about getting over my fear of starting seedlings from scratch. Well, get a load of those little seedings now:
They're big, healthy tomato plants! Growing happily in the garden. I can't wait until harvest time.
J.
June 30, 2010
June 24, 2010
Biking is hot!
In more ways than one! I don't know how it is in your community, but around here, cycling as a form of tranportation is finally getting some press. First, the Secretary of Transportation, a Washington, D.C. cyclist himself, talked about the importance of cycling infrastructure on National Public Radio. Locally, my city (Rochester, New York) has been listed as one of the top 50 U.S. cities for bicycling by Bicycling magazine. Okay, granted, it's number 50, but we still made the list! Finally, Rochester is also working on a bicycling master plan.
And, with the rise in gas prices and the recent tragedy of the oil spill in the Gulf of Mexico, many people are turning to cycling as transportation to minimize the use of fossil fuels.
Well, there is a definite need for public policy advocacy in terms of the issues surrounding the oil spill, but that's a topic for many other blogs. With sewgreen's emphasis on living in an earth-friendly manner, I thought I would address one of the perceived barriers for people who would like to commute to work by bike: what to wear.
Specifically, I have found I really have to have a system for what to wear on the bike, and what to wear once I get to work. Some people have jobs where dress is not an issue, and others are comfortable wearing business attire while biking. That's not the case for me, though.
First of all, like I said, biking is hot! Even when it's relatively cool outside and I'm going a short distance, I sweat. So, for the ride, I wear comfortable clothing. It doesn't have to be bright neon lycra and spandex, but light-colored clothing is helpful in terms of visibility. Generally, I wear what I would wear for a walk, except that I pretend the temperature is about 15-20 degrees (Fahrenheit) higher than it actually is, and dress accordingly. (I tend to get warm very quickly; your internal thermostat may vary.)
I carry lunch, clothing, and anything else I need for the day in 2 rear panniers on my bike. I recommend ones that are waterproof, as you never know when a downpour might come. (I'm looking out the window at one right now and hoping that it stops before I have to bike home!) Two panniers are better than one if you carry much of a load at all, as they allow you to evenly distribute the weight.
I find it fairly easy to towel off at work and change into my work clothes. After many times of forgetting some essential piece of clothing, I keep the following in a filing cabinet at work: black shoes, a simple black top, black jacket, bra, and pantyhose. (Black goes with everything!) I also keep a pack towel (found in the camping section of stores, this is a very thin towel that dries quickly), deodorant, and hair product.
Speaking of hair, I'm an au naturel kinda gal, so hair and make-up is mostly a non-issue for me. My hair is extremely short, but I actually do still get helmet head. My solution for that is a cycling cap worn under my helmet. That helps capture some of the sweat and eliminates the indentations in my hair, which really wouldn't add much to my professional credibility.
As a case in point, yesterday, I biked to my first meeting of the day, at another campus of the college where I work than the one in which my office is located. I have biked there several times, and I have a favorite bike rack and big bathroom where it's easy to change. I got there, grabbed one of my panniers with my clothing in it, and changed for my meeting. I should have gotten there a bit earlier, as it was a muggy day and frankly I was still bright red when I got to the meeting. Fortunately it was a fairly casual group whom I know pretty well. I try to have about 10-15 minutes of cooling-down time before my meetings on hot days, but I just didn't have the timing right yesterday!
My next meeting was at a university down the road/bike trail. I changed back into my biking clothes. I could be casual at this meeting, so I just changed into a clean and non-sweaty top for that meeting. Then I headed to my office, and followed my usual routine.
It took some planning, but by 11:30 that morning I had biked over 10 miles, just going about my business. All of these trips only took 5 minutes more (at most) than it would have to drive, and I got some exercise to boot.
Today, my partner gave my bike and me a ride to work (we do have a car; we just try to minimize driving as much as possible) because I was doing a video and didn't have time for the cooling down time. At the end of the day, I grabbed the pannier with my bike clothes in it, changed, and headed home. First, though, I did a 30-minute fast ride along the trail to get my aerobic workout in. Then I headed over to the neighborhood farmers' market. And finally I made it home.
Share your tips and/or questions about bike commuting in the comments!
June 17, 2010
The Three R's - Part 1
As I was preparing to write this post, I was thinking about what Sew Green is all about. Living ecologically, obviously. But there is a craft or creative element to the blog. So then I started thinking about one of the basic environmental tenets: reduce, reuse, recycle. This post and the next two will explore the three R's, with an emphasis on craft.
Every knitter has this problem. No, I'm not talking about lack of time or a tendency toward obsessive/compulsive behaviour. I'm talking about the stash. The contents of the stash fall into two categories: yarn that had to be bought because it was too gorgeous to pass up, and will be used for future projects and leftover yarn that is too long to throw out and may possibly be needed for something at some distant future date.
I'm pretty good about resisting new yarn, but I'm horrible when it comes to throwing out the scraps. Recently, when I was trying to find a bag to take to the grocery store and realized that they were all full of yarn, I decided that it was time to seriously reduce the stash.
So, here are a couple of my successes...
Snake from Jess Hutchinson's book (now sadly out of print) using leftover yarn from baby blankets. Almost done!
French press cozies using wool leftover from making toques.
And a bunch of suggestions...
How are you reducing your stash?
June 15, 2010
a small food shop
image from the guardian: Jeanette Winterson outside her store Verde's in Spitalfields. Photograph: Dan Chung for the Observer
my friend eireann sent along this article this morning and i thought that readers here might be interested in it. i found it very uplifting and inspiring and a nice concise statement on buying small and local....
once upon a life - jeaette winterson .
she opened a small food shop instead of allowing a chain coffee shop into the building where she lived. hip hip hooray.
June 10, 2010
Refresh your wardrobe on the cheap
A few weeks ago, as I was looking at the clothes I have in my wardrobe for Spring/Summer, I came across a few tired old favourites. Items of clothing I couldn't bear to part with (or put in the scrap fabric bag), but didn't wear any more, for one reason or another. Being perpetually skint* has a way of making you more creative with what you have. One old Guns 'n' Roses tee got an Alabama Chanin makeover. One cotton sundress had its cap sleeves removed and its broken elastic waist moved and re-elasticised. A check tunic top had its shrunken cap sleeves removed and a few other pieces had minor repairs (buttons sewn back on, holes patched up). I'm wearing all these clothes with pride again, just like when they were new.
*That's British slang for "penniless", "broke" or "poor" -- don't say I never taught you anything. Check out the Cockney Rhyming Slang website for a really good laugh. (:
Of course, there are a number of environmental benefits to revitalising old clothes, so I thought I'd share with you a few simple alteration techniques. Don't worry, as long as you have a needle and thread, pins, sharp scissors and an iron, you'll be OK (although a tailor's tape and a fading fabric marker will be very good investments too). In case you don't know much about the anatomy of a garment, here's a few Wikipedia definitions for you:
The first step is to decide what needs changing. Put the garment on and take a good look in a full-length mirror. I was keen to preserve the gorgeous details on the body of this dress (the piped seams and beautiful scalloped neckline), so when I decided I needed to nip in the waist, I decided on the side seams (the ones directly under my arms). The sleeves wanted to be shorter. A general rule with sleeves of any size is that the eye will be drawn to your body at the point they stop. These sleeves stopped at an awkward point somewhere between my bust and my waist -- lengthening them would be a nightmare, so bust it is! Then there was the skirt's hem. It was "frump" length. I like the skirt to fall just above the knee - the perfect length, or at least the most versatile, for wearing bare-legged, with jeans, with leggings, with tights & biker boots, etc. So that meant about 10" had to go.
Because of the masses of fabric in the skirt (94.5" around!), that was the biggest job, so that's where I started.
I turned the dress inside out and laid it on my sewing table. I then used my tape measure to fold the hem up 27cm, just over 10", and added a row of pins 3cm or 1.25" up from the fold and about 3" apart, to mark a line to cut. Once this was done all the way around the hem, I cut off the extra fabric, using the line of pins as a guide. It's important that you don't just cut a straight line across the garment, as hems are often not straight lines, even though they may look it!! Measure carefully up from the existing hem. :)
The next step is to press the hem. Still with the garment inside-out, fold the now raw edge up 3cm/1.25" and iron it down all the way around. When you get back to the beginning, fold the raw edge under itself so that it is completely enclosed and press. Do this all the way around again, adding a pin every few inches to keep the fold in place for the next step.
Note: I stitched this hem by hand, in keeping with the original hem. If you have the choice of sewing by hand or by machine, then just remember to be sensitive to your garment. If I'd slapped a row of machine stitches along this hem, it would have ruined the integrity of the dress. However, for other dresses I've altered that was exactly what they wanted. Many machines will do a "blind stitch" which gives the same outside look as a hand-stitched hem, but (on my machine at least!) you have to fold and press the hem just-so, which can be fiddly. If in doubt, test on a piece of scrap fabric!
Back at the sewing table, thread a needle (this thread should be the same colour as the original thread!) Garment still inside-out, make two or three small stitches on the top of the hem fold only. This just locks it in place. Now for the first stitch: about every 0.25"/5mm, make a tiny vertical stitch down that pierces just the outer fabric on its way out, then pierces the top of the hem fold on the way in (so it goes through 3 layers of fabric). The stitches on the inside of the fabric should look long and slanted (like a "\" turned 90 degrees clockwise) and those on the outside should be tiny and vertical.
Just continue until you come to where you started and you're done! When you reach the end of your thread, lock it in place (two or three small stitches on the fold, on top of each other) and start with a new length of thread.
This process is the same for sleeves, but instead of turning up 3cm of fabric, turn up about 2cm (just under1").
Stitch along this line (I used my machine, but a backstitch is your best option if you're sewing by hand). Now turn your garment right-side out and try it on. If the fabric is now wrinkled or puckered, you should let the seam out a little on that side (make a new line of stitches further out, then unpick the old one using a stitch unpicker or embroidery scissors). When your seams are in their final place, add a row of zig-zag stitches outside them if you can, just to reinforce them. Unless the seam now looks really bulky when you put the garment on, there's no need to cut the excess fabric off. In fact, if you leave it on, you can adjust the seam again if you need to in the future.
And you're done!
For inspiration, have a look at the New Dress a Day blog.
What are your alteration tips?
Maimy x
P.S., check out my new collection of handbags on Etsy! ;)
*That's British slang for "penniless", "broke" or "poor" -- don't say I never taught you anything. Check out the Cockney Rhyming Slang website for a really good laugh. (:
Of course, there are a number of environmental benefits to revitalising old clothes, so I thought I'd share with you a few simple alteration techniques. Don't worry, as long as you have a needle and thread, pins, sharp scissors and an iron, you'll be OK (although a tailor's tape and a fading fabric marker will be very good investments too). In case you don't know much about the anatomy of a garment, here's a few Wikipedia definitions for you:
- Hem: To hem a piece of cloth (in sewing), a garment worker folds up a cut edge, folds it up again, and then sews it down. The process of hemming thus completely encloses the cut edge in cloth, so that it cannot ravel. A hem is also the edge of cloth treated in this manner.
- Seam: ...the stitching that joins two or more pieces of fabric.
- Dart: Darts are folds sewn into fabric to help provide a three-dimensional shape to a garment. They are frequently used in women's clothing to provide a fit that closely follows the shape of the wearer.
The first step is to decide what needs changing. Put the garment on and take a good look in a full-length mirror. I was keen to preserve the gorgeous details on the body of this dress (the piped seams and beautiful scalloped neckline), so when I decided I needed to nip in the waist, I decided on the side seams (the ones directly under my arms). The sleeves wanted to be shorter. A general rule with sleeves of any size is that the eye will be drawn to your body at the point they stop. These sleeves stopped at an awkward point somewhere between my bust and my waist -- lengthening them would be a nightmare, so bust it is! Then there was the skirt's hem. It was "frump" length. I like the skirt to fall just above the knee - the perfect length, or at least the most versatile, for wearing bare-legged, with jeans, with leggings, with tights & biker boots, etc. So that meant about 10" had to go.
Because of the masses of fabric in the skirt (94.5" around!), that was the biggest job, so that's where I started.
Altering the hem:
I turned the dress inside out and laid it on my sewing table. I then used my tape measure to fold the hem up 27cm, just over 10", and added a row of pins 3cm or 1.25" up from the fold and about 3" apart, to mark a line to cut. Once this was done all the way around the hem, I cut off the extra fabric, using the line of pins as a guide. It's important that you don't just cut a straight line across the garment, as hems are often not straight lines, even though they may look it!! Measure carefully up from the existing hem. :)
The next step is to press the hem. Still with the garment inside-out, fold the now raw edge up 3cm/1.25" and iron it down all the way around. When you get back to the beginning, fold the raw edge under itself so that it is completely enclosed and press. Do this all the way around again, adding a pin every few inches to keep the fold in place for the next step.
Note: I stitched this hem by hand, in keeping with the original hem. If you have the choice of sewing by hand or by machine, then just remember to be sensitive to your garment. If I'd slapped a row of machine stitches along this hem, it would have ruined the integrity of the dress. However, for other dresses I've altered that was exactly what they wanted. Many machines will do a "blind stitch" which gives the same outside look as a hand-stitched hem, but (on my machine at least!) you have to fold and press the hem just-so, which can be fiddly. If in doubt, test on a piece of scrap fabric!
Back at the sewing table, thread a needle (this thread should be the same colour as the original thread!) Garment still inside-out, make two or three small stitches on the top of the hem fold only. This just locks it in place. Now for the first stitch: about every 0.25"/5mm, make a tiny vertical stitch down that pierces just the outer fabric on its way out, then pierces the top of the hem fold on the way in (so it goes through 3 layers of fabric). The stitches on the inside of the fabric should look long and slanted (like a "\" turned 90 degrees clockwise) and those on the outside should be tiny and vertical.
Just continue until you come to where you started and you're done! When you reach the end of your thread, lock it in place (two or three small stitches on the fold, on top of each other) and start with a new length of thread.
This process is the same for sleeves, but instead of turning up 3cm of fabric, turn up about 2cm (just under1").
Taking in the seams at the waist:
Sorry, this is the part where you look like an idiot for a while. Put your garment on inside-out. Trust me. Use your fingers to pinch the side seams at your waist (the smallest part between your bust & hips) until it feels comfortable and looks even. Put a couple of pins in either side. This will give you a stitch guide. Take the garment off (phew), and use a tape measure (or ruler) and pins (or fabric marker/tailor's chalk if you have it), mark out where you will stitch the seams. Make them as symmetrical to each other as possible. The line should start and end on the original seam line, otherwise you will end up with unexpected tucks in the fabric.This dress fit well at the bust, but was saggy around my waist. By adding a row of stitches just a short way in from the outer seams, I nipped in the waist for a much better fit. Here's how.
Stitch along this line (I used my machine, but a backstitch is your best option if you're sewing by hand). Now turn your garment right-side out and try it on. If the fabric is now wrinkled or puckered, you should let the seam out a little on that side (make a new line of stitches further out, then unpick the old one using a stitch unpicker or embroidery scissors). When your seams are in their final place, add a row of zig-zag stitches outside them if you can, just to reinforce them. Unless the seam now looks really bulky when you put the garment on, there's no need to cut the excess fabric off. In fact, if you leave it on, you can adjust the seam again if you need to in the future.
And you're done!
For inspiration, have a look at the New Dress a Day blog.
What are your alteration tips?
Maimy x
P.S., check out my new collection of handbags on Etsy! ;)
June 2, 2010
Storytime
One of the things I’ve loved about becoming a parent is the excuse to read picture books. We make regular trips to the library, were I scout out things with intriguing and beautiful illustrations, delightful language or interesting stories. Ideally all of the above. My son grabs anything and everything and demands for it to be read, there and then. After a few stories (and some negotiations) we carry home a bag full of “new” books (perhaps with a few favorites that we’ve read before) to enjoy over the next few weeks.
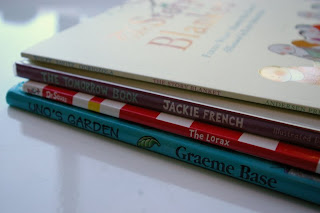
Along the way we’ve found a few books with a creative and green edge that we have really enjoyed, so much so that we’ve bought our own copy. Although I’ve definitely noticed an increasing presence of green and environmentally friendly children’s books in our favourite bookshops, the selection below are not as simplistic or preachy as some of these seem to be. Rather, issues of environmental awareness, sustainability, creativity, recycling or regeneration are intrinsic to excellent stories. Perhaps you might enjoy these too, or if you have any favorites of your own, please do share!
The Lorax, by Dr Seuss: An oldie but a goodie. Dr Seuss was way ahead of his time with this one. Or perhaps he was on time but the rest of the world wasn’t ready to listen. I remember reading this when I was a child with a real sense of discomfort and sadness at the destruction wrought by the Once-ler and his knitting efforts. Yes, it gives knitting a bad name, but it also leaves you with some seeds of hope, that perhaps it is possible to nurture the environment back to good health if we take the time to try.
Uno’s Garden, by Graham Base: We love Graham Base books here. There is always so much to discover and uncover in his illustrations (The Waterhole is also one of our favorites). The story follows the degradation and subsequent regeneration of a wonderful forest, initially full of strange and wonderful creatures and plants, until people start to live there. Ultimately a natural balance is achieved, with the people and the forest living in harmony. The story also explores mathematical sequences, offering some reading interest in the years to come.
The Curious Garden, by Peter Brown: Based on the real life urban regeneration of the High Line railway in New York, this is a beautifully illustrated tale about a young boy turned gardener, whose interest in the plants he discovers in a desolate industrialized city, transforms the city and the lives of its occupants. Peter's illustrations have a retro look and a wonderful humorous quality.
The Tomorrow Book, by Jackie French, illustrated by Sue Degennaro: Jackie French has written a range of wonderful books about gardening, sustainability and self sufficiency, including a number of children's books. This one is brought to life through imaginative collage illustrations by Sue Degennaro. Perhaps the most preachy and direct about sustainability in the book selection here, this story is about a small prince who wonders why the world outside his home doesn’t reflect the things he has learned in all the books he has read. When his parents go on holiday, leaving him in charge, he and the children of the city start to put in place simple, sensible and easy solutions to the environmental issues they see around them. There is hope for tomorrow.
The Story Blanket, by Ferida Wolff and Harriet May Savitz, illustrated by Elend Odriozola: This book I happened upon by chance when I was looking for a gift for a friend. It is a wonderful tale about knitting, recycling, giving, and sharing, complemented by beautiful watercolor illustrations. Babba Zarrah owns a colorful woolen blanket that children sit on to listen to her stories. But resources are scarce, and Babba Zarrah gradually unravels the blanket to knit things that are needed by others. When the villagers realize why her blanket has been shrinking they give her a wonderful surprise in return.
Iggy Peck, Architect, by Andrea Beaty, illustrated by David Roberts: Of course, I would be a sucker for any children’s book about Architecture, but even if you’re not an Architect, this book will delight. It’s a story about a young boy who is compelled to design and create, coupled with beautiful rhythmic rhyming prose, and captivating intricate watercolor illustrations (I’d really love to knit an Iggy sweater one day). Iggy wins over his architecture-phobic Grade 2 teacher when he masterminds a creative solution to the dire situation that his class finds themselves in.
Subscribe to:
Posts (Atom)