August 31, 2010

Island SummeRRR

my girls and i are blessed with the opportunity to spend our summers up at our family cottage. my husband comes for as long as work allows - and my mom joins us when she can. the cottage is located on galiano island, part of the gulf islands, off the west coast of Canada. it is a summer we spend as a tight family unit. a summer without television, reliable cel phone reception, sporadic internet access (only when we go into "town"), and living with the idea of creating as little trash as possible.

galiano island (roughly the size of the island of manhattan, with a permanent population of 1200 people, that blooms in the summer with tourists and cottage dwellers) does not have a landfill. any trash must be taken off island - whether through a service, or (as we do) by your own hand. the first time we visited the island - when my eldest was barely one - we rented a small cottage without laundry facilities, and with no laundromat on the island (water conservation is another big issue here)we were stuck with disposable diapers. i will never forget driving off island with a trash bag of diapers tied to the top of our minivan. (it felt like a drive of shame.)  now we have laundry access and work hard not to use anything disposable. cloth napkins, handkerchiefs and rags abound. my diva cup is ready when that time arrives. and the compost pile accepts all of our food waste. (we are lucky there are no real predators on the island, so do not have to concern ourselves with inviting unwelcome visitors with meat scraps.)

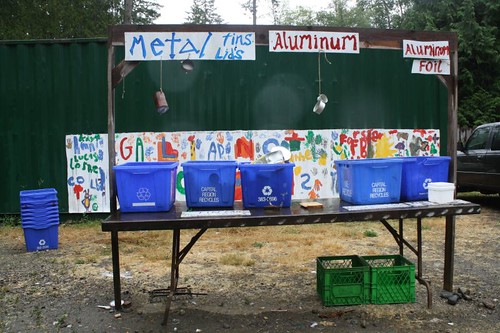
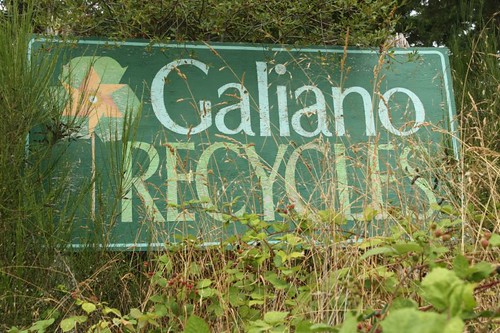
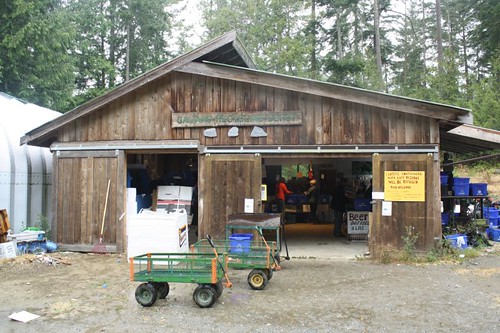
what the sign says.

what we do produce can usually be recycled and the island's innovative, and extensive recycling facility. GIRR (Galiano Island Recycling Resources) operates as a non-profit and includes the recycling center and a "free store", as well as a rental service for plastic dish and cutlery sets for large scale entertaining.  Over 100 tonnes of waste are diverted from off-island landfill by the facility each year.  It is reborn as road construction materials, plastics, manufacturing components, tin cans, drink bottles/cans/containers, paper, newspaper and cardboard boxes

Recycling Depot
metals

knowing what we can recycle guides our shopping as well. milk is purchased in glass bottles. bulk items loaded into paper bags. farm-stands and the saturday farmer's market are frequented.  fish is purchased right off the boat.

this year we left with one small shopping bag of trash in the car.

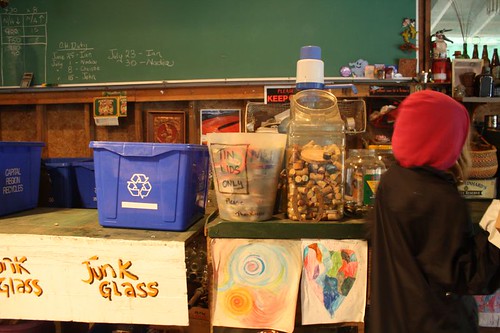
the girls have turned into 3R detectives. they know which plastics can be recycled and which cannot. they know which materials bring the depot money, and which are simply sent off. they love to sort things and navigate the system with ease. it is a skill i believe strongly in, and a big part of developing environmental stewardship.

sorting

these are ideals we are trying to bring home to the city - where it is so much easier to not think about it. we are hoping to establish a more extensive recycling program at our neighbourhood school. i wish LA would get on board. i hear my friends tell of exciting advances in other cities, and think of the impact a change in LA waste management would make. hopefully it will happen before my little stewards of change grow up.

does your school have an innovative recycling program? i would love to learn more...

August 26, 2010

Green Housing: Getting the most out of what you have

 before (currently)

In my architectural day job I work on large projects, mostly University buildings. It might seem like a far cry from designing homes, but I realised recently that a lot of the issues that come up in my work are also relevant to how people might address their housing needs in a more sustainable way- using their (undoubtedly) limited resources in the most effective way to meet their needs. In Australia continually rising housing prices have led many people (ourselves included) to rethink how they use their existing home, instead of buying a different larger one.

Making the best possible use of existing physical resources and materials (Reusing and Recycling) is often better environmentally (and in other ways too) than building new, even if the new building incorporates the latest ‘environmentally friendly’ materials, technology and ‘green building’ design research. I find many of the homes I’ve seen on World’s Greenest Homes appalling, with regards to their consumption of resources and pursuit of brand spanking new, cavernous, luxury, even if they are using some environmentally good materials in a clever way.

I’d like to highlight 5 green building design principles about making the most of what you have already have, and explain how we have been applying them over the last couple of years, as we’ve been renovating and expanding our own home and garden. I'm not claiming that our home is one of the world's greenest, but it is certainly greener than many alternatives.

after (hopefully)

1. Think long term. Our needs always change over time, but it doesn’t make sense to address short term needs in a way that compromises long term needs, or creates a whole lot of wastage or redundant renovations.Think about the big picture master plan, not just the problem that is bugging you today. You may have a toddler now, but will you still be living in this home when they are 10? 20? 30?? (Hmmmm, scary thought...)
With a child entering into our life, we realized we needed a new craft/study room, more living space, and a dining space that could seat more than two people without rearranging the furniture. Fortunately, we had an outside space that was completely underutilized, where we could build two new rooms.

2. How else can you use it? Flexible and adaptable spaces are more useful in the long term than highly specialised spaces. Some rooms have to be single function- the kitchen and bathroom aren’t going make very good bedrooms- but can other rooms be changed around (bed/craft/lounge/dining room) as needs change? Perhaps small changes, like changing doors or windows, removing a wall, adding power points, removing fixed storage, or changing lighting will change how you can use the spaces you already have.
Our rooms aren’t big, but they’re generous enough, with doors in sensible locations, so that they can be used in different ways, with different furniture layouts. We can use our new craft/study room as a bedroom if we need to, as can a future owner.

3. Inside and Outside. Depending on your climate, at different times of the year the spaces outside your home can really expand your living space, and the kinds of things you do. Are you invited out by being able to see and hear what’s happening outside? Is the door in the right spot? Is the space outside at the same level as inside? Is it shady or sunny, sheltered from wind or rain, appropriately paved or decked?
We hardly used our back garden because you had to go through the laundry (which included a toilet) to get there, and immediately down a couple of ugly concrete steps. Not ideal, especially when you have visitors. By building a deck area and installing a new (fully glazed) back door into our kitchen, we now have much more light in our kitchen, can see how lovely the garden is, and spend a lot more time in out there.

4. Collecting water. Where we live, the price of tap water is cheap, so until the government brought in restrictions on how we use it, investing in large rainwater tanks didn’t seem worthwhile. However it’s now our legal option for watering the garden, washing the car or letting our toddler play under the sprinkler. You can also collect rainwater for toilet flushing or laundry, depending on how you set the system up. Rain and grey water collection options vary, depending on local regulations, budget, space and water needs.
We now have two water tanks- one in the front yard and one in the back, to help our efforts to set up a food producing garden and shade trees. We also have a basic grey water system set up so that we can collect bathwater to hand water our small lawn when it needs it.

5. Sun and Shade. The key to keeping a building warm (or cool), without spending money on energy, is letting the sun in (or keeping it out), along with insulating the walls, floors and roof. The potential benefits vary depending on your climate and time of year. There is also energy saving benefit if the daylight means you don’t need to turn the lights on all the time. The location and size of windows, type of glass, and any fixed, movable or growing shade (inside or outside) will all make a difference.
We packed our extension with insulation (the existing house has virtually none, so we do rely on air conditioning to keep us cool upstairs in summer) and installed large windows with special coated glass on the sunny side of the house. A sheer blind reduces glare on sunny winter days. In hotter months, we have a removable fabric sunshade that shades the window and the outside deck. All our shade trees are fast growing and deciduous (sadly not native) which means the garden gets sun in winter, but our lawn is beautifully shaded and cool in summer.

I’ve tried to keep this as a simple outline- something to perhaps get you thinking, and inspire you to investigate further. There are many resources out there for more detailed information on green building design and many of the things I’ve mentioned- too many to pick just a few. I encourage you to Google, or if you’re in Australia on 12th September, it happens to be Sustainable House Day, with many homes, all over the country, open to visitors and all their questions.
August 13, 2010

Make yourself un-stinky!


I have been reading about handmade deodorant for a few years now, but was always a bit skeptical. Each recipe seemed to involve melting stuff, or buying bulk ingredients to use in small amounts- not super practical. I have been off the traditional antiperspirant & deodorant for a long time since it is full of scary stuff like aluminum, phthalates & fragrance [See Secret Wide Solid's rating at Skin Deep] which is liked to neurological problems, cancer and reproductive toxicity. And there is an excessive amount of plastic used for each tube. Instead I used Trader Joe's deodorant which was pretty safe, eco friendly, and cheap. I saw no reason to make things more complicated for myself.


But here's the catch: I loved the Trader Joe's deodorant, and Toms of Maine, and other non-toxic deodorants I have used BUT they don't really work that well. I feel bad saying it, but they quit by the end of the day. I just assumed that was the nature of using non-toxic deodorants and have lived with it for far too long. Until now.

I came across this recipe, from this website and I had all the ingredients in my kitchen already. Plus there was no heating involved. But what really caught my attention was the rave reviews. And I am here to add to those reviews.

Let me say it loud and clear: THIS STUFF WORKS FOR ME. And it works all day, and in to the next. In fact, since I switched, I have not had one single moment of smelliness. Total awesomeness. 

UPDATE: There is an instructional video and FAQ from the og website here: http://www.passionatehomemaking.com/2013/01/homemade-all-natural-deodorant.html


Homemade Amazing Deodorant:
Adapted from Passionate Homemaking

The original recipe calls for either corn starch or arrowroot powder, but since I had both, I used both. Some folks complained about irritation in the comments due to the amount of baking soda- and found that using less helped. I have had no problem with the amount of baking soda so I will continue with these proportions. Also the coconut oil can go from solid to liquid depending on the storage temperature. Mine stays at a perfect semi-solid in my bathroom, and melts to an oil when I rub between my fingers.

5-6 tablespoons coconut oil
1/8 cup arrowroot powder
1/8 cup cornstarch
1/4 cup baking soda
Several drops of bergamot oil [optional]

Mix the powders together in a jar and slowly add the coconut oil until you have a "pomade" consistency and powders are mostly dissolved. Add a few drops of oil until it has a lovely hint of scent.


To use, scoop out a pea sized amount and rub between your fingers to melt and create a smooth texture. Apply under your arms and rub any left into your hands as a moisturizer.

Since the coconut oil changes rapidly from a solid to a liquid I would not recommend trying to use a traditional deodorant "stick" but rather to scoop from the jar.

If you are at all hesitant about making your own, this is the recipe that will win you over! Non toxic, plastic free, sustainable, and extremely effective. Total win-win.

Cheers!

EDIT:
I would like to answer some questions from the  comments.  Please note that I am not a deodorant expert in anyway.  I found this recipe on the internet and have been using it for 3+ years.  I am just sharing & reviewing my experience with the recipe.  Click the links above for the original recipe and read through the comments for more information.

Does the coconut oil cause oily stains on your clothes? 
I haven't had any problems with staining.  Test it out on an old shirt and let it dry first if you are nervous.

Just for clarification, this is just a deodorant, not an antiperspirant, right?
Yes, this is more of a deodorant than an antiperspirant BUT I have noticed considerably less sweating? It might be the corn starch or baking soda? Or just my body since I haven't used antiperspirant in 10 years and don't notice sweating that much anymore.

I am allergic to coconut so I was wondering what could be substituted for coconut oil?
For oil substitute? I don't know. Something shelf stable? Coconut oil is stable, anti-fugal and anti-bacterial which is why it works. Other homemade deodorant recipes use Shea butter- you might want to find a different recipe. 

I really want to try this but I can't find arrowroot anywhere. Was wandering if maybe tapioca starch or anything else could be substituted?
You can find arrowroot in the spice section of the grocery stores.  See jar pictured above.  Other stores may have it in the baking section.  Not sure about tapioca- but you can sub with corn starch.  

We don`t want her using all that chemical on her. Has anyone used this for kids?
I have not tried this on a kid. I would test a small patch first for irritation. The baking soda can be harsh. 

AND, I have one. I absolutely cannot stand Coconut. I even gag with the smell. I wish I wasn't like that, but I am.  What can I substitute? Someone, Please help. :)
For oil substitute? I don't know. Something shelf stable? Coconut oil is stable, anti-fugal and anti-bacterial which is why it works. Some refined coconut oils do not smell like coconut- those might be your best bet. Other homemade deodorant recipes use Shea butter- you might want to find a different recipe. 

You know your body best and can figure out what works for you. 

UPDATE: There is an instructional video and FAQ from the og website here: http://www.passionatehomemaking.com/2013/01/homemade-all-natural-deodorant.html

August 5, 2010

latest finds for kids


once my daughter was born, i knew better than to swear that i wasn't going to have ANY plastic toys in my house. but i did really want to keep from buying cheap plastic toys as much as possible. i was grateful for all the hand me down items that were given to us [which have since been handed down again]. and i scoured craigs list and freecyle and berkeley parents network for items that i thought we could use. [btw - berkeley parents network is a GREAT resource. it's full of information on parenting and tips on bay area businesses, etc. you have to be in the bay area to sign up for their lists, but anyone can browse the site for info. i wonder if other communities have similar networks set up? if you know of any leave the info in the comments?]


i was really happy to discover green toys . they are actually made in california [the state where i live] and are made from recycled plastic milk jugs. you can read more about the process here . the thing that i really like about green toys, though, is that they LOOK nice too. i have to admit that looks are important to me. especially since toys are going to get left lying around. i might as well find the objects strewn about my living room aesthetically pleasing to look at right?


i was able to find a shop locally that carried the toys so i went and checked them out in person. they look and FEEL nice. my daughter is still a bit young for most of their toys, but i definitely will be getting some for her in the future.

green toys has their own online shop, or here's a list of stores that also carries their stuff.


the other thing i found were these stainless steel drinking straws. my daughter has just discovered the joys of drinking from a straw. i happened to have a very old box of plastic straws around that we've been going through, but i really didn't want to have to buy a new box of straws. so wasteful. and i certainly didn't want to try and explain to an 18 month old that we couldn't use a straw because they were bad for the environment. nor did i want to try and find BPA free plastic straws [somehow the thought of trying to keep a plastic straw clean didn't really work for me]. but stainless? these i like! the only bummer was that i couldn't find any locally to buy, so i gave in and purchased some from amazon .

and so goes my recent adventures in green shopping for the little. not as cool or green as re-making bibs into handy wipes, but it's what i got !

July 29, 2010

News!


Hi there,

Usually my Sew Green posts are reviews of books—and generally those books are about sustainable agriculture. But today I'm posting about an anthology related to sustainable agriculture that I compiled and designed!

Unlike the authors of the books I've reviewed, I'm not a scientific expert, journalist, or an acclaimed writer. So instead I designed a book that is a cross between a coffee table book (filled with delicious images) and a collection of poetry and creative non-fiction.

From Orchards, Fields, and Gardens features writing from 11 authors, and photos and illustrations from 21 artists. The authors remember activities, people, and places that shape(d) their appreciation for small scale food production and processing. (Sew Green's own bugheart has both writing and photos in the book.)

From Orchards, Fields, and Gardens: Art and rememberings celebrating sustainable agriculture and good food will be back from the printer mid-August! Until then, you can pre-order the book and get $4 off of the regular price.

I hope you like it!


July 16, 2010

my dog has fleas.

and I cannot bear the thought of a chemical treatment. At least until I've exhausted other options.

What should I do? Well of course turn to you for advice!

corbin palms campout 2010

I am thinking she must have picked them up at the beach. Or from a walk in the neighbourhood. Temperatures here have hit the triple digits so I am thinking that may contribute to it. (Though I may be wrong.) In any case - how do I get rid of them (short of picking them off by hand and drowning them...) and how do I prevent them from coming back?

Thank you!

July 8, 2010

turn old bibs into new wipes

bibs to wipes 1

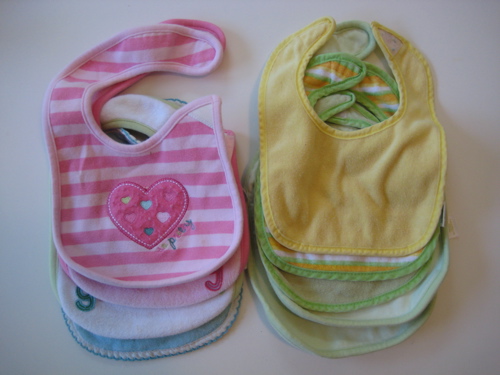
We have a large basket of well-used bibs at our house. Many of them were hand-me-downs and have kept many a baby and toddler from besmirching their finery over the years. Quite a few of them have been plain old worn out, with velcro that somehow lost its stick, and years' worth of baby food stains that will never wash out.

I hate throwing away useful things, especially baby things which seem to cost so much and function for so short a time. I debated a while about simply sewing new velcro onto these bibs, but the stains on many are so icky (and we have a mountain of bibs that do work), that I decided to make them into wipes instead. You can never have enough wipes, and I feel guilty every time I use a disposable one.

This is a ridiculously easy project. Here's how I made mine:

bibs to wipes 2

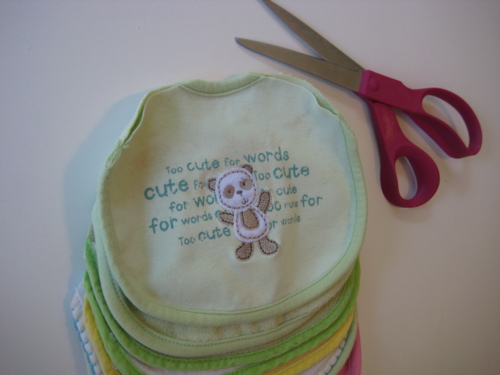
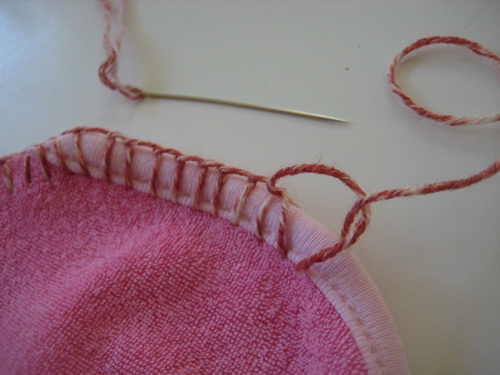
1. Cut the tabs off the bibs. I trimmed mine into a pleasing symmetrical shape (symmetry is optional).

bibs to wipes 3

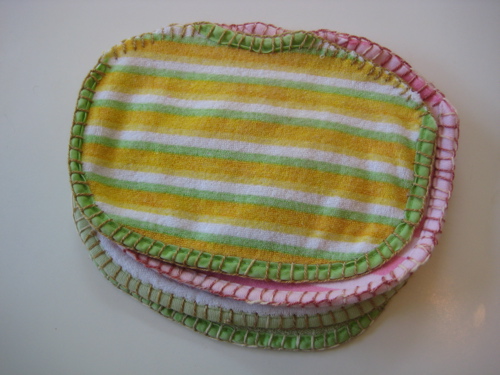
2. Use a decorative stitch around the outside edge to finish the raw edges and make the whole thing look nice. I used mattress stitch. Be sure to use a sharp embroidery needle and a lightweight cotton yarn or crochet thread (mine was leftover cotton sock yarn).

bibs to wipes 4

Voila! Two steps and you've got a tidy pile of re-usable baby wipes, kitchen rags, burp cloths, or washcloths - already pre-stained so you don't need to feel bad about getting them good and dirty.

p.s. Those more adept at sewing than I am could remove the original piping from the discarded part of the bib and trim out the raw edges with that, eliminating the need for the fancy hand-stitching. Totally up to you!

June 30, 2010

Garbage-less Lunches

I may write a whole lot about food over at my other blog (It Ain't Meat, Babe), but I don't get much of a chance to write about how that food gets eaten. I usually leave that up to my readers. But personally, despite spending most of my time thinking about how the food gets prepared, I also have some systems in place for how it gets eaten.

First let me tell you that my day job necessitates a lot of travel. A LOT! I am rarely in my office. Some days I am working in rural communities two hours out of the city. Some days I'm in some far-flung suburb. Occasionally I am lucky enough to be working somewhere within walking or biking distance. As a result of this, I've become very good at packing a lunch. I know it's usually the most cost-effective and environmentally friendly thing to do. Not to mention the fact that vegan food is hard to come by in most places, especially if I'm looking for a quick lunch to eat while I'm traveling.

So I pack my lunch. But what do I pack it in?


Over my many years of lunch-bringing, I've figured out how to make everything involved with my lunch reusable. Lots of schools have garbage-less lunch programs in place, I figured why not have a one-woman garbage-less lunch policy in place for myself?

My first step was to find some glass containers with good lids. I try to use as little plastic as possible, period. Although we have no microwave at home, I do sometimes use one when I'm lunching elsewhere and I am loathe to microwave any of my food in a plastic container. (Why fuss around trying to figure out if one container or another is "microwave safe" when you can just avoid the potential danger all together?)

So far, in our house, we've tried three different kinds of glass containers (all have plastic lids). The little round one in the photo above is made by Anchor. We have larger versions as well and I have to say that they are the clear winners. They are union-made in the United States and they are reasonably priced, widely available, and oven safe. The lids fit tightly, even after a few dishwasher washings. They aren't completely leak-proof, but they aren't too bad if the food inside isn't too liquidy.

The other container in the photo is made by Pyrex and it is my least favourite of our three varieties. The sizes are kind of awkward, and the lids are freakishly tight at first and then loosen a lot when washed in the dishwasher. Though I must say, looking at their website it seems they've introduced a line of containers with "No-Leak Lids". I'd be anxious to give those a try.

My other favourite is the Glasslock containers (not pictured). The lids are almost completely leak-proof (why "almost"? Well, let's just say my purse smells a bit more like curried cauliflower than I'd like it too. However, my boss brings soup in one of these containers everyday and her briefcase is unscathed, so I may just have a slightly wonky specimen.) These are a little heavier than the Anchor containers and some of them are labelled "not safe for oven". They are also made in the U.S.A.


The other lunch item I never leave home without is my homemade cutlery holder. If you can sew in a straight line, you can make one of these. All it is, is a rectangle of fabric, folded over on one end with stitches making sections of the fork, knife, spoon, and napkin. I added a ribbon to one end so that after I fold down the top flap and roll it up, I can tie it closed. Some spare cutlery from a secondhand store and a cute cotton napkin complete the project. It doubles as a placemat if you want to be fancy. And at the end of the week you can throw it in the washer. I like it so much I'm slowly making similar ones for all my coworkers.

And last, but not least, (though totally unrelated to lunches, at least right now) I wanted to give you all a garden update. You may remember my last post about getting over my fear of starting seedlings from scratch. Well, get a load of those little seedings now:


They're big, healthy tomato plants! Growing happily in the garden. I can't wait until harvest time.

J.

June 24, 2010

Biking is hot!


In more ways than one! I don't know how it is in your community, but around here, cycling as a form of tranportation is finally getting some press. First, the Secretary of Transportation, a Washington, D.C. cyclist himself, talked about the importance of cycling infrastructure on National Public Radio. Locally, my city (Rochester, New York) has been listed as one of the top 50 U.S. cities for bicycling by Bicycling magazine. Okay, granted, it's number 50, but we still made the list! Finally, Rochester is also working on a bicycling master plan.

And, with the rise in gas prices and the recent tragedy of the oil spill in the Gulf of Mexico, many people are turning to cycling as transportation to minimize the use of fossil fuels.

Well, there is a definite need for public policy advocacy in terms of the issues surrounding the oil spill, but that's a topic for many other blogs. With sewgreen's emphasis on living in an earth-friendly manner, I thought I would address one of the perceived barriers for people who would like to commute to work by bike: what to wear.

Specifically, I have found I really have to have a system for what to wear on the bike, and what to wear once I get to work. Some people have jobs where dress is not an issue, and others are comfortable wearing business attire while biking. That's not the case for me, though.

First of all, like I said, biking is hot! Even when it's relatively cool outside and I'm going a short distance, I sweat. So, for the ride, I wear comfortable clothing. It doesn't have to be bright neon lycra and spandex, but light-colored clothing is helpful in terms of visibility. Generally, I wear what I would wear for a walk, except that I pretend the temperature is about 15-20 degrees (Fahrenheit) higher than it actually is, and dress accordingly. (I tend to get warm very quickly; your internal thermostat may vary.)

I carry lunch, clothing, and anything else I need for the day in 2 rear panniers on my bike. I recommend ones that are waterproof, as you never know when a downpour might come. (I'm looking out the window at one right now and hoping that it stops before I have to bike home!) Two panniers are better than one if you carry much of a load at all, as they allow you to evenly distribute the weight.

I find it fairly easy to towel off at work and change into my work clothes. After many times of forgetting some essential piece of clothing, I keep the following in a filing cabinet at work: black shoes, a simple black top, black jacket, bra, and pantyhose. (Black goes with everything!) I also keep a pack towel (found in the camping section of stores, this is a very thin towel that dries quickly), deodorant, and hair product.

Speaking of hair, I'm an au naturel kinda gal, so hair and make-up is mostly a non-issue for me. My hair is extremely short, but I actually do still get helmet head. My solution for that is a cycling cap worn under my helmet. That helps capture some of the sweat and eliminates the indentations in my hair, which really wouldn't add much to my professional credibility.

As a case in point, yesterday, I biked to my first meeting of the day, at another campus of the college where I work than the one in which my office is located. I have biked there several times, and I have a favorite bike rack and big bathroom where it's easy to change. I got there, grabbed one of my panniers with my clothing in it, and changed for my meeting. I should have gotten there a bit earlier, as it was a muggy day and frankly I was still bright red when I got to the meeting. Fortunately it was a fairly casual group whom I know pretty well. I try to have about 10-15 minutes of cooling-down time before my meetings on hot days, but I just didn't have the timing right yesterday!

My next meeting was at a university down the road/bike trail. I changed back into my biking clothes. I could be casual at this meeting, so I just changed into a clean and non-sweaty top for that meeting. Then I headed to my office, and followed my usual routine.

It took some planning, but by 11:30 that morning I had biked over 10 miles, just going about my business. All of these trips only took 5 minutes more (at most) than it would have to drive, and I got some exercise to boot.

Today, my partner gave my bike and me a ride to work (we do have a car; we just try to minimize driving as much as possible) because I was doing a video and didn't have time for the cooling down time. At the end of the day, I grabbed the pannier with my bike clothes in it, changed, and headed home. First, though, I did a 30-minute fast ride along the trail to get my aerobic workout in. Then I headed over to the neighborhood farmers' market. And finally I made it home.


Biking is an invigorating and yet relaxing way to get around. Yes, commuting by bike takes some planning, but once you get in the routine, it's much more carefree than driving, dealing with traffic, and circling for parking spaces.

Share your tips and/or questions about bike commuting in the comments!

June 17, 2010

The Three R's - Part 1


As I was preparing to write this post, I was thinking about what Sew Green is all about. Living ecologically, obviously. But there is a craft or creative element to the blog. So then I started thinking about one of the basic environmental tenets: reduce, reuse, recycle. This post and the next two will explore the three R's, with an emphasis on craft.


Every knitter has this problem. No, I'm not talking about lack of time or a tendency toward obsessive/compulsive behaviour. I'm talking about the stash. The contents of the stash fall into two categories: yarn that had to be bought because it was too gorgeous to pass up, and will be used for future projects and leftover yarn that is too long to throw out and may possibly be needed for something at some distant future date.

I'm pretty good about resisting new yarn, but I'm horrible when it comes to throwing out the scraps. Recently, when I was trying to find a bag to take to the grocery store and realized that they were all full of yarn, I decided that it was time to seriously reduce the stash.

So, here are a couple of my successes...

Snake from Jess Hutchinson's book (now sadly out of print) using leftover yarn from baby blankets. Almost done!


French press cozies using wool leftover from making toques.

And a bunch of suggestions...
How are you reducing your stash?

June 15, 2010

a small food shop


image from the guardian: Jeanette Winterson outside her store Verde's in Spitalfields. Photograph: Dan Chung for the Observer

my friend eireann sent along this article this morning and i thought that readers here might be interested in it. i found it very uplifting and inspiring and a nice concise statement on buying small and local....

once upon a life - jeaette winterson .

she opened a small food shop instead of allowing a chain coffee shop into the building where she lived. hip hip hooray.

June 10, 2010

Refresh your wardrobe on the cheap

A few weeks ago, as I was looking at the clothes I have in my wardrobe for Spring/Summer, I came across a few tired old favourites. Items of clothing I couldn't bear to part with (or put in the scrap fabric bag), but didn't wear any more, for one reason or another. Being perpetually skint* has a way of making you more creative with what you have. One old Guns 'n' Roses tee got an Alabama Chanin makeover. One cotton sundress had its cap sleeves removed and its broken elastic waist moved and re-elasticised. A check tunic top had its shrunken cap sleeves removed and a few other pieces had minor repairs (buttons sewn back on, holes patched up). I'm wearing all these clothes with pride again, just like when they were new.

*That's British slang for "penniless", "broke" or "poor" -- don't say I never taught you anything. Check out the Cockney Rhyming Slang website for a really good laugh. (:

Of course, there are a number of environmental benefits to revitalising old clothes, so I thought I'd share with you a few simple alteration techniques. Don't worry, as long as you have a needle and thread, pins, sharp scissors and an iron, you'll be OK (although a tailor's tape and a fading fabric marker will be very good investments too). In case you don't know much about the anatomy of a garment, here's a few Wikipedia definitions for you:
  • Hem: To hem a piece of cloth (in sewing), a garment worker folds up a cut edge, folds it up again, and then sews it down. The process of hemming thus completely encloses the cut edge in cloth, so that it cannot ravel. A hem is also the edge of cloth treated in this manner.
  • Seam: ...the stitching that joins two or more pieces of fabric.
  • Dart: Darts are folds sewn into fabric to help provide a three-dimensional shape to a garment. They are frequently used in women's clothing to provide a fit that closely follows the shape of the wearer.
This is a vintage Laura Ashley dress. It was my mum's, and I've been itching to give it a makeover for a couple of years now. It's a UK size 12, one size too big for me, which makes it perfect for altering. I'm going to take you through what I did with it yesterday to make it into this:

The first step is to decide what needs changing. Put the garment on and take a good look in a full-length mirror. I was keen to preserve the gorgeous details on the body of this dress (the piped seams and beautiful scalloped neckline), so when I decided I needed to nip in the waist, I decided on the side seams (the ones directly under my arms). The sleeves wanted to be shorter. A general rule with sleeves of any size is that the eye will be drawn to your body at the point they stop. These sleeves stopped at an awkward point somewhere between my bust and my waist -- lengthening them would be a nightmare, so bust it is! Then there was the skirt's hem. It was "frump" length. I like the skirt to fall just above the knee - the perfect length, or at least the most versatile, for wearing bare-legged, with jeans, with leggings, with tights & biker boots, etc. So that meant about 10" had to go.

Because of the masses of fabric in the skirt (94.5" around!), that was the biggest job, so that's where I started.


Altering the hem:

I turned the dress inside out and laid it on my sewing table. I then used my tape measure to fold the hem up 27cm, just over 10", and added a row of pins 3cm or 1.25" up from the fold and about 3" apart, to mark a line to cut. Once this was done all the way around the hem, I cut off the extra fabric, using the line of pins as a guide. It's important that you don't just cut a straight line across the garment, as hems are often not straight lines, even though they may look it!! Measure carefully up from the existing hem. :)

The next step is to press the hem. Still with the garment inside-out, fold the now raw edge up 3cm/1.25" and iron it down all the way around. When you get back to the beginning, fold the raw edge under itself so that it is completely enclosed and press. Do this all the way around again, adding a pin every few inches to keep the fold in place for the next step.


Note: I stitched this hem by hand, in keeping with the original hem. If you have the choice of sewing by hand or by machine, then just remember to be sensitive to your garment. If I'd slapped a row of machine stitches along this hem, it would have ruined the integrity of the dress. However, for other dresses I've altered that was exactly what they wanted. Many machines will do a "blind stitch" which gives the same outside look as a hand-stitched hem, but (on my machine at least!) you have to fold and press the hem just-so, which can be fiddly. If in doubt, test on a piece of scrap fabric!

Back at the sewing table, thread a needle (this thread should be the same colour as the original thread!) Garment still inside-out, make two or three small stitches on the top of the hem fold only. This just locks it in place. Now for the first stitch: about every 0.25"/5mm, make a tiny vertical stitch down that pierces just the outer fabric on its way out, then pierces the top of the hem fold on the way in (so it goes through 3 layers of fabric). The stitches on the inside of the fabric should look long and slanted (like a "\" turned 90 degrees clockwise) and those on the outside should be tiny and vertical.

Just continue until you come to where you started and you're done! When you reach the end of your thread, lock it in place (two or three small stitches on the fold, on top of each other) and start with a new length of thread.

This process is the same for sleeves, but instead of turning up 3cm of fabric, turn up about 2cm (just under1").


Taking in the seams at the waist:

This dress fit well at the bust, but was saggy around my waist. By adding a row of stitches just a short way in from the outer seams, I nipped in the waist for a much better fit. Here's how.
Sorry, this is the part where you look like an idiot for a while. Put your garment on inside-out. Trust me. Use your fingers to pinch the side seams at your waist (the smallest part between your bust & hips) until it feels comfortable and looks even. Put a couple of pins in either side. This will give you a stitch guide. Take the garment off (phew), and use a tape measure (or ruler) and pins (or fabric marker/tailor's chalk if you have it), mark out where you will stitch the seams. Make them as symmetrical to each other as possible. The line should start and end on the original seam line, otherwise you will end up with unexpected tucks in the fabric.

Stitch along this line (I used my machine, but a backstitch is your best option if you're sewing by hand). Now turn your garment right-side out and try it on. If the fabric is now wrinkled or puckered, you should let the seam out a little on that side (make a new line of stitches further out, then unpick the old one using a stitch unpicker or embroidery scissors). When your seams are in their final place, add a row of zig-zag stitches outside them if you can, just to reinforce them. Unless the seam now looks really bulky when you put the garment on, there's no need to cut the excess fabric off. In fact, if you leave it on, you can adjust the seam again if you need to in the future.

And you're done!

For inspiration, have a look at the New Dress a Day blog.

What are your alteration tips?

Maimy x

P.S., check out my new collection of handbags on Etsy! ;)

June 2, 2010

Storytime

One of the things I’ve loved about becoming a parent is the excuse to read picture books. We make regular trips to the library, were I scout out things with intriguing and beautiful illustrations, delightful language or interesting stories. Ideally all of the above. My son grabs anything and everything and demands for it to be read, there and then. After a few stories (and some negotiations) we carry home a bag full of “new” books (perhaps with a few favorites that we’ve read before) to enjoy over the next few weeks.

Along the way we’ve found a few books with a creative and green edge that we have really enjoyed, so much so that we’ve bought our own copy. Although I’ve definitely noticed an increasing presence of green and environmentally friendly children’s books in our favourite bookshops, the selection below are not as simplistic or preachy as some of these seem to be. Rather, issues of environmental awareness, sustainability, creativity, recycling or regeneration are intrinsic to excellent stories. Perhaps you might enjoy these too, or if you have any favorites of your own, please do share!

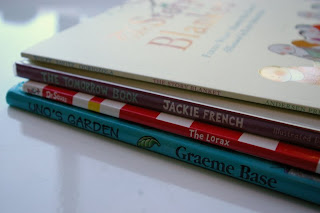
The Lorax, by Dr Seuss: An oldie but a goodie. Dr Seuss was way ahead of his time with this one. Or perhaps he was on time but the rest of the world wasn’t ready to listen. I remember reading this when I was a child with a real sense of discomfort and sadness at the destruction wrought by the Once-ler and his knitting efforts. Yes, it gives knitting a bad name, but it also leaves you with some seeds of hope, that perhaps it is possible to nurture the environment back to good health if we take the time to try.

Uno’s Garden, by Graham Base: We love Graham Base books here. There is always so much to discover and uncover in his illustrations (The Waterhole is also one of our favorites). The story follows the degradation and subsequent regeneration of a wonderful forest, initially full of strange and wonderful creatures and plants, until people start to live there. Ultimately a natural balance is achieved, with the people and the forest living in harmony. The story also explores mathematical sequences, offering some reading interest in the years to come.

The Curious Garden, by Peter Brown: Based on the real life urban regeneration of the High Line railway in New York, this is a beautifully illustrated tale about a young boy turned gardener, whose interest in the plants he discovers in a desolate industrialized city, transforms the city and the lives of its occupants. Peter's illustrations have a retro look and a wonderful humorous quality.

The Tomorrow Book, by Jackie French, illustrated by Sue Degennaro: Jackie French has written a range of wonderful books about gardening, sustainability and self sufficiency, including a number of children's books. This one is brought to life through imaginative collage illustrations by Sue Degennaro. Perhaps the most preachy and direct about sustainability in the book selection here, this story is about a small prince who wonders why the world outside his home doesn’t reflect the things he has learned in all the books he has read. When his parents go on holiday, leaving him in charge, he and the children of the city start to put in place simple, sensible and easy solutions to the environmental issues they see around them. There is hope for tomorrow.
The Story Blanket, by Ferida Wolff and Harriet May Savitz, illustrated by Elend Odriozola: This book I happened upon by chance when I was looking for a gift for a friend. It is a wonderful tale about knitting, recycling, giving, and sharing, complemented by beautiful watercolor illustrations. Babba Zarrah owns a colorful woolen blanket that children sit on to listen to her stories. But resources are scarce, and Babba Zarrah gradually unravels the blanket to knit things that are needed by others. When the villagers realize why her blanket has been shrinking they give her a wonderful surprise in return.

Iggy Peck, Architect, by Andrea Beaty, illustrated by David Roberts: Of course, I would be a sucker for any children’s book about Architecture, but even if you’re not an Architect, this book will delight. It’s a story about a young boy who is compelled to design and create, coupled with beautiful rhythmic rhyming prose, and captivating intricate watercolor illustrations (I’d really love to knit an Iggy sweater one day).  Iggy wins over his architecture-phobic Grade 2 teacher when he masterminds a creative solution to the dire situation that his class finds themselves in.

May 27, 2010

green dog

ah yes. a puppy has entered our lives. it is not completely unplanned. we have often talked about it around the dinner table. but i was surprised by how quickly it all really happened! i have always had strong feelings about adopting a pet. we have visited the shelter, and also contacted rescues at different points, but nothing ever quite worked out. until now. friends'(not breeders) dog had puppies, and they needed to be placed in homes. (said mama dog has now been neutered oops spayed.) a puppy answered my condition of chicken-friendliness. or at least chicken-get-along-ness. (they are getting along smashingly!) my current employment situation has me working from home so that was a consideration as well. i have the time to care and train a puppy. so we held a family vote - and welcomed moxie to our family.

::

and now we are faced with all the accouterments of pet ownership. our choices need to be good for her health and good for our planet.

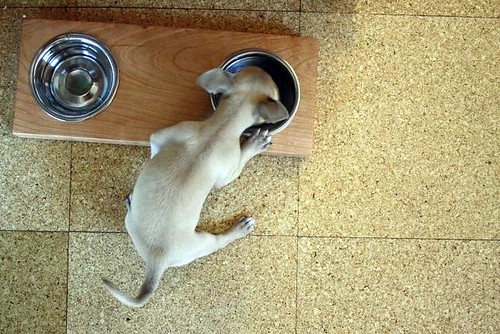
there seems to be plenty out there for "earth-friendly" pet bedding, feeding bowls, toys, leashes and collars. a google search gives lots of options. we chose to buy local and/or handmade as much as possible. we were very lucky to receive some hand-me-downs from our favourite dogs next door. a carrier was one item checked off our list. a trip to our favourite neighborhood shop, green and greener, provided leash and collar. uncommon goods has some darling chew toys - but we have made a few impromptu chewies with old socks and some organic cotton batting we had on hand. so squeaky - but she seems to like them. i didn't want a plastic bowl, so purchased two small "ferret bowls" at a local pet shop which my husband installed in a fabulous holder.

just for moxie

her bed right now is an old cardboard box with a towel and my youngest's napping blanket - which she generously donated. it isn't a permanent solution - so i ordered a machine-washable felted bed today. i want to make this as well.

and oh yes - the poop. not easily compostable like our chook droppings. i have been doing some reading on hot composting. we will see. and the pee. we aren't investing in pricey training pads since i'm at home but have put down some newspaper when we have to run out on an errand.
and of course there are the myriad of food choices, bath and beauty choices and so on...

here are some other resources I found useful:
Pet food ratings
Natural Resources Defence Council's GreenPaws initiative to get improved Federal protection for chemicals going into pet care products

i know there is much i've missed here - and i am curious - how do you keep your pet keeping green?

May 13, 2010

rechargeable batteries


having a baby monitor finally got me on the path to re-chargeable batteries. i KNOW. what took me so long? honestly it was the initial cost and then all the bad reviews of rechargeables that i read oh so long ago. but battery technology has changed by leaps and bounds - even in the last couple of years.

i broke down and bought an energizer recharger to charge batteries for the baby monitor. i was in line at walgreens - realized the three AAA's in it were about to die soon and i WAS NOT going to just buy more cheap batteries to keep throwing them away [ahem i mean recycle them. luckily where i live it's easy - you just put them in a plastic bag on top of your garbage can and the city recycles them. you can use this site to find a recycling spot for your batteries in the states].

i bought the sort of lame energizer re-charger that i spied amongst all the normal akaline batteries. i say sort of lame because it DOES work - i always have charged AAA batteries when i need them [1.5 weeks is about how long they last with how i use the monitor daily]. the lame part is that plugged in the charger has constant green lights. not green when they are finished charging, or green for a little bit, but green all the time. i leave the charger in the kitchen and since i need the batteries so often i have to admit i pretty much always leave it plugged in [because if i didn't i would forget to charge the batteries. i know this for a fact].

i tell myself that it is functioning as a night light - but i do feel guilty about the vampire drain and wish it shut off when the batteries were charged. but that's too complicated a task for my less than $10 charger. you get what you pay for... but i am happy that i have spared almost year and a half's worth of AAA batteries every 1.5 weeks. [that's 156 batteries if my math is right].


it's definitely time, though, to invest in a whole SET of batteries and a charger. the energizer will do AA's too, but i do have things around the house that need C's and sometimes even D's.... [flashlights, portable radio, the all important bubble making machine that my daughter loves]. i know that we'll probably have toys in our future that will need batteries too.

in my quest for better rechargeables i read this article . and am thus really contemplating the eneloop batteries pictured above. you can find a set of 8 AA's, 2 AAA's, 4 C's and 4 D's for under $40 with shipping. here's a list on amazon . that pays for itself after what only 8 packs of $5 batteries. not bad i think.

apparently this new generation of rechargeables holds their charge longer [even away from the charger] and the charger is smart and won't over charge the batteries. two problems i read over and over in complaints about older NiMH rechargeables. my only complaint is that there isn't a 9Volt option. we have a remote that uses a 9Volt and so i'll have to find an alternative for that.

if you want to read all about different kinds of batteries, how they work, and how long they last - i found this very technical [and yet readable] article.

anyone out there have any great rechargeable experience that they want to share??? i'm all ears. i think i'm going to make my final purchase decision by the end of the month. if anyone cares i'll try and post a post script to this post with my choice[s] and how i feel about them.

May 6, 2010

Mother's Day/ Gulf Oil Spill

This Sunday, May 9th, is Mother's Day in the United States and I would like to give a shout out to all the awesome & amazing mothers out there. There is nothing as challenging and as rewarding as being a mom.
As children we love and take care of our mothers. As a mothers we take care and protect our children at all costs; we give them life & food [see above]. I believe that one of the best ways to take care of our children, and our children's children, is by taking care of the Earth, and it, in turn, will take care of us. Hence the name Mother Earth.
And here I was going to create a list of all the eco-friendly ways to honor our mothers, but in light of the recent catastrophic oil spill I would like to share some suggestions I have found of ways to help.

Please do what you can to minimize the damage to Mother Earth and make her a part of your mother's day celebration.
Cheers and Happy Mother's Day!