
Last year I first tried my hand at making some découpage ornaments.
This is a fancy French way of saying that I glued some stuff on glass balls from the store. Sadly, the balls weren't hand-felted from locally-raised sheeps' fleece or anything like that, they were just on sale after Christmas. Glass (or glass-like) ornaments also turn up in the thrift stores right after Christmas, which is a good way to both be more green, and to stock up if you're one to plan holiday projects 11 months in advance.
Anyhow, last year I really had a great time with it, and decided to do it again this year. This is a fun project for one evening at home with some hot chocolate and a new album of holiday songs. It's a very kid-friendly project, as well. I'd love to see versions made from kids' drawings!
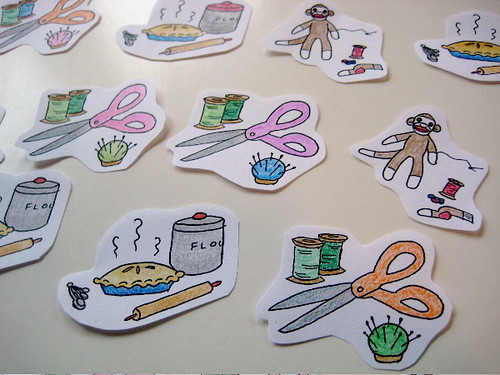
Last year I made a set of Darth Vader ornaments for a friend, made with dark purple glass balls, and Vader pictures from a comic book. This year I decided to use drawings I'd done myself of little crafty scenes, and a couple of boxes of silver balls, to make ornaments as little gifts for my friends.
Here's everything you need for this project:
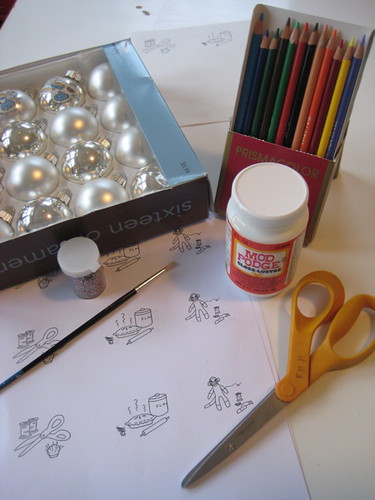
1. A box of ornaments; 2. A set of small drawings (small enough to fit on your ornaments, which is pretty small); 3. Mod Podge glue and a paintbrush for applying it; 4. Colored pencils or crayons; 5. Scissors; 6. Glitter (optional, but why would anyone skip the glitter??).
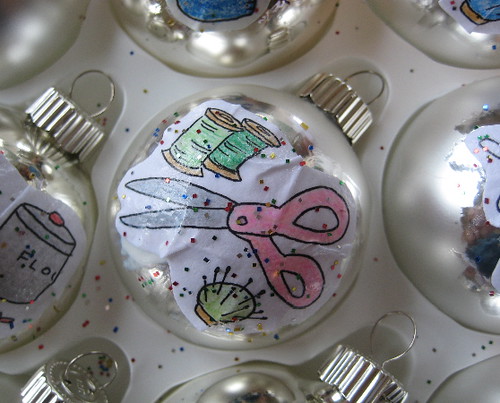
Just color the little pictures and cut them out carefully. Don't use markers to color them - the glue could make the colors run. Crayons or colored pencils work best. When trimming the pictures, I like to cut away as much white space as I can - this eliminates paper wrinkles when you glue them onto the ornaments.
Paint the back of a picture with Mod Podge, and then carefully place it on the ornament. Don't worry if it doesn't lie flat at first. Paint over the top of the picture, smoothing it down as you go. There will probably be some minor wrinkles - just try to keep them in the blank spaces rather than in the drawing itself. Flatten them down with the handle of your paintbrush, and make sure that everything is lightly and smoothly painted over with glue.
Sprinkle lightly with glitter. Really, a light touch is plenty here. The ones I did when I was generous with the glitter don't look half as good.
That's it! You can do a whole box of ornaments on one mug of hot chocolate if you're quick.

====
Okay Sew Greeners, I know you can come up with some ways to make this project even greener. I've been thinking about greener sources for the ornaments themselves (the thrift store, your attic...). What else could I do to make this a more eco-friendly project in the future??
5 comments:
What about things from nature like pine cones, acorns, etc... They are plentiful and so many good ideas for ornaments in the fall or save them for winter. Felted sweaters, I could go on and on! I save bottle caps that I'm going to use to use as bases for trees for a nature table theme.
i love your little drawings f.pea! they are adorable....
This is a cute idea, like the blog..
Handmade ethical jewellery at
http://surfjewels.webhosting-for-free.com
fantastic idea!
Eliminate the paper step and bust out the permanent markers and decorate right on the balls?
Use recycled/recovered yarn and crochet little lacy Victorian-style covers for them?
Post a Comment