December 16, 2010

Five Easy Ways to Reduce Waste This Holiday Season

Hello Sew Greeners! I'm sure you're all in the midst of your busy holiday preparations. I know I am.

We all know this season can be stressful in a whole slew of different ways. One of the things about the season that stresses me out is trying not to lose touch with my sustainable living goals as the madness of the holiday season ramps up. My husband always reminds me to go easy on myself because the world doesn't necessarily make it easy for us all to do the right thing. Nevertheless, here's my list of five easy ways I've reduced the amount of waste my festive season generates. Please feel free to post your own tips in the comments!

1. Give the Gift of Nothing.


Nothing tangible, that is. One of the best gifts my best friend Kat ever gave to me was agreeing to read one book of my choosing. She put no other limits on it, saying I could choose fiction or non-fiction, heavy or light, trashy or deep. Whatever I chose, she promised to read from cover to cover. After much thought I asked her to read Animal, Vegetable, Miracle by Barbara Kingsolver. That book changed the way I felt about food and inspired me to make small changes in how I ate every day, and I thought it might do the same for her. It did! Seeing her start to patronize local farmers' markets and even can her own spaghetti sauce and apple sauce in the fall, was amazing and exciting for me. The gift lasted for months! And if you choose a book that's available through the local library system, no one needs to buy anything!

2. Give To Someone Who Really Needs It.


This year my brother, sister-in-law, husband and I all agreed to give to charity instead of giving each other gifts. I'd initially suggested that we all donate to one charity, but my brother had the genius idea of choosing a different charity for each person, so we could have the fun of picking something uniquely suited to each of us. And it keeps up the all-important surprise factor.

One word of advice about this kind of gift giving. If you're going to pitch this to family members or friends, I'd encourage you to do it as early in the season as possible. Some people buy gifts early, and nothing breeds resentment like you swooping in with your awesome non-gift gift ideas when they have something wrapped up and stowed away for yo already.

3. If You Do Give a Gift, Use Reusable Wrappings.


I've been an enemy of wrapping paper for years, and this has led to me sewing my own fabric gift bags. These are the easiest things to sew, and a great beginner project. All you need is a rectangle of fabric. Hem one side and then fold the wrong sides together and sew up the other three sides. Turn it right side out and pop your gift in there. You can tie it closed with reusable ribbon or twine and attach a gift card to the ribbon. It takes almost no time and the bags can be used over and over again. I always buy Christmassy fabric when I see it in the fabric section at second hand stores, regardless of the time of year (you'd be surprised what shows up in July!) I take it home and wash it and stash it away for gift giving season. I also try to keep some of my bags every year so I don't have to make all new ones the following year. but people seem to like to keep them to give their own gifts in, which is fine too!

(My aforementioned friend Kat posted my more detailed fabric gift bag tutorial on her blog if you need a bit more coaching!)


4. Buy Local Everything.


Most people have to buy holiday specific things this time of year, whether they're giving piles of gifts or not. As tempting as it is to order everything off the internet, buying from a local store or local craft sales or local artists or local farmers, means that you control how much packaging your gift comes wrapped in. You can also ask questions about how things are made and shipped, and as a bonus you're supporting your local economy and the people in your community who depend on it. One of our local farmers' markets has a special Christmas market every year where you can buy both gifts (soap, jewelry, quilts etc) and food. I came home this year with a big bag of locally grown carrots, beets, Jerusalem artichokes, honey, and cranberries.

5. Clean Out Your Pantry.


This one only really occurred to me the other day. I had done a hurried, frazzled grocery shopping trip and came home feeling overwhelmed by all the stuff I still need to do as the holidays approach. When I started putting my purchases in the fridge and pantry, I realized that not only did I have minimal space in the fridge and pantry, I also had no idea what was taking up all that space in the first place. I got so agitated my husband had to put everything away for me.

The following day I got up early and went to work a few hours before I normally begin my days. This, plus skipping my lunch, allowed me to come home three hours earlier than normal. I spent those three hours cleaning out the fridge and pantry cupboard. I dug deep and found that I had bulk items in the pantry that I'd forgotten about. Everything got organized and put into my collection of glass jars. Now I am completely aware of what's available to me as I start my holiday food prep. There will be no over-buying and wasting of food. Plus I know what I need to use up and I can do that before it goes stale. And it had the added bonus of making me feel so much calmer about my kitchen in general. Win, win.

J.

December 9, 2010

Gifts for your favorite bike commuter


Here in the U.S., over-commercialized gift-giving season is in full swing! I thought I would share some unique gifts for the bicyclist in your life (even if that's YOU!). (None of these organizations/individuals even know that I am writing about them, and I have not received-somewhat regretfully-any payment from them for my comments.)

You could always start with the not-so-subtle hint on the Christmas stocking pictured above, made by etsy seller PursuitsofHappiness.

Once you get that bicycle, perhaps you'd like to add a bicycle cargo trailer. (Another not-so-subtle hint: I really want one of these!). They're on sale over at the Bike Shop Hub. I've ordered other items from Bike Shop Hub and always received prompt and efficient service.

If you're more of the DIY type, head over to Planet Green for some plans to make your own trailer.

This fall, I treated myself to an Ortlieb bicycle briefcase, fully pictured and reviewed at Ecovelo. I pretty much agree with their review, with the one caveat that the bike rack hardware can get a little uncomfortable when one is carrying the briefcase across a college campus.

You could also follow in the footsteps of Jody at that which rolls and make your own panniers out of kitty litter buckets. I love the concept, but I would look even funnier carrying that across a college campus.


(picture from Cyclelicious.)

Along with constant reminders to shop or else our economy will go to hell in a handbasket, this time of year brings cold, snow, and ice to many regions in the U.S. Yes, Virginia, you can bike in the winter. My compadres over at RocBike have lots of tips. In addition to the link provided above, type "winter biking" into the search engine there and you will get lots more tips and tales.

One item that many RocBikers have found useful in this time of shortened daylight is the DownLow Glow. (I wouldn't mind one of these in my stocking either.) You will definitely be visible in midwinter darkness with these mounted on your bike.

For the first time this year, I have studded tires for my bike. Now, I haven't actually had the time to put them on the bike, even though we have about a foot and a half of snow on the ground, but this weekend it will happen! I was sold on studded tires by Adam Durand and Jack Bradigan Spula, also of RocBike fame.

I purchased mine, but apparently you can make your own. Who knew?

One more winter bike necessity that would make a great gift are fenders. They keep that stuff on the road from ending up on your back.

For more DIY ideas, try the bicycle repair stand at Instructables. Or, head over to Cyclelicious for a whole bunch of ideas, including a sew-your-own bicycle cap, shoe covers from old conference bags (I for one have way too many of those), and a bicycle Ipod charger.

Happy whatever-you-celebrate! (Me, I mostly celebrate the end of the academic semester!)

December 3, 2010

The 3 R's - Part 3

I posted in June on reducing and in September on reusing. Now it's time for a post on recycling. I always think that reusing and recycling aren't all that far apart, but I guess the difference is that reusing means using something again for the same purpose, while recycling is making it into something entirely new. Which brings me to:


This is a great little store located in the heart of Osborne Village in Winnipeg, Manitoba. Owner Andee sells awesome handmade goods, many crafted in Winnipeg, and some created in the back of her store. She has a MySpace page, and Etsy site, and a blog, but none of these do her store justice. Which is a shame because she's doing something really unique and wonderful in this city.

She's a fibre freak (since I don't really know her except from shopping in her store, I hope she won't mind me calling her that) who is constantly creating new things from old. Clothes, bags, belts and accessories - all from recycled fabrics and yarn. Plus she crochets. And her inspiration is her mom. How nice is that?

Christmas is just a few weeks away and I always feel stressed out and heavy at this time of year. But supporting local crafters and artisans takes the edge of those feelings. It also helps me not have a meltdown over all those knitting projects that aren't quite done!

Wishing you joy and peace and lots of craftiness.

Happy Hanukkah!

Happy Hanukkah to those that celebrate! And happy December to those that don't!

I create a little craft tutorial on my blog for a Jewish star garland using origami stars. I used found origami paper, but I think these would be awesome to make from old magazines or newspapers destined for the recycling bin. You can view the image in more detail on flickr .


Cheers!

November 25, 2010

Green your party season, and Happy Thanksgiving!

I'd like to begin by saying Happy Thanksgiving to you guys across the pond! But I have a couple of confessions.

The first is, I nearly forgot to write this post because I'm so busy (in a good way!).

And the second is that up until a few days ago, all I knew about Thanksgiving was that it is a day when lots of Americans eat lots of turkey. And on TV programmes everyone sits around the table listing what they're thankful for.

Well, I couldn't possibly list all the things I'm thankful for. But I think it's interesting how the idea of thankfulness is, I think, part of the core of the green movement -- thankfulness for the life we've been given and the planet we have to live it on. And what better thought to start what, for many of us, can be the most wasteful time of year?

So I thought I'd leave you with a few top-tips for reducing your rubbish this holiday season without spoiling your fun as you go partying, giving, shopping and feasting. And if it all seems a bit overwhelming, just do what you can. A little effort can go a long way ...


Christmas tree furoshiki, GreenerFrog on Etsy (also, click here to visit Hop Frog Pond for excellent furoshiki information and instructions!)

1. Furoshiki -- gift wrapping with fabric. Traditionally, the Japanese giver would unwrap the gift in front of, and then present it to, the recipient and take the wrapping cloth home with them. This isn't necessarily a practical solution in many cases, but it would be easy to keep a set of cloths for wrapping your family's presents. Make them part of your holiday tradition, re-loving them year on year along with the baubles!

2. Aim to only send cards to those you can't see in person during the season, and choose recycled or sustainably sourced cards where you can. Save the cards you receive to make new cards or gift tags next year!

3. Try to plan ahead, and if you want to give someone a gift but don't know what they'd like, ask! That way, you can avoid panic-buying that over-packaged gift set -- and if all else fails, get a gift voucher.

4. And when I say gift voucher, make sure you check out Etsy, DaWanda and other handmade venues for sellers who might offer them. :)


Vintage comet rhinestone brooch, ThePeacockFeather on Etsy

5. Make your new party dress a vintage gem, or check second-hand venues for a treasure somebody else got tired of. Then alter it to fit you like a glove! Admiring those sparkly embellished bandos that are everywhere at the moment? Grab a plain bando, and pin a vintage brooch and some trim to it for a covetable party hairpiece.

6. Avoid leaving a bad taste by buying local food; avoiding over-packaged food in the supermarket; choosing organic and free-range; and making full use of your fridge and compost bin for leftovers :)

Above all, remember to relax and enjoy yourself, and the company of your loved ones!

And this is my final contribution to Sew Green this year, so I'd like to wish you all a (very universal) Happy Holidays and my best wishes for the new year!

Maimy x

November 19, 2010

If the pants fit, wear them out.

Clothes and fashion are topics that pop up regularly on Sew Green, and with good reason. We all dress ourselves on a daily basis (and many of us are also dressing our children), and I'm sure we notice and respond to what other people have dressed themselves in every day too. But it seems to me that clothing and fashion are inherently not about sustainability. Core drivers of the fashion industry are consumption and change- constantly throwing out the old, and buying the new. And the reality of wearing clothing is that it wears- few (if any) garments have a unlimited lifespan.

When Shash did her recent post about Slow Clothes, I had also been thinking long and hard about the state of my (and my family's) wardrobe, and doing a little bit of sustainable fashion research. One of the web resources that I found that I felt was quite useful, in regards to clothing yourself and your family more sustainably, was this post at Planet Green, which I found via Treehugger. There are many ways of approaching a more sustainable wardrobe, and this post succinctly captures 10 key ideas. Some might tie in with things you already do, others might fire your interest and inspire you to research, think or take action in a different way. Their tips cover a number of approaches to shopping and thinking about your clothing needs, caring for your clothes, and disposing of them when you're done.

Number 2 on their list (love your duds) inspired me to sit down and do some mending to some toddler clothes. I received a couple of pairs of good quality pants from a friend when she was clearing out her son's wardrobe a year ago. In addition to being worn by her son for some time, they've now been worn by my son for most of the year too. I have to say we love them. They have a great feature that gives them true trans-seasonal functionality- the bottom of the leg can be zipped off so they transform from long pants into shorts (particularly great when you live in a place that is famous for offering four seasons worth of weather per day). However, after so much wear I noticed that not only were the hems well past being well worn, but the fabric was starting to fall apart at the knees.

As they still fit really well, and are so handy to have, I decided to give them a bit of a life injection by patching the knees. We pulled out some fabric scraps from the scrap tub and I stitched them over the worn places with rows of three-step zig zag. Definitely not perfect, but perfectly appropriate for casual toddler play pants I think. While I was in the swing of it, I also mended a fraying linen tea towel (the only kind of tea towel to have) and a few holes in some toddler T-shirts (must keep a closer eye on him when he's playing with his scissors!).

I hope the Planet Green post also inspires you in some way. Some other inspiring links and resources I have come across include:
  • ecouterre which provides posts in a range of fashion and beauty issues and news items, and whose mission page highlights some hard core facts about the environmental impact of clothing and the fashion industry; 
  • How big is your eco, an Australian site listing local fashion labels including their eco credentials in relation to fabric, care, packaging or carbon footprint. It's made me more aware of some local designers and manufacturers(like Otto and Spike, and Gorman) who I'm now keeping an eye out for on those occasions when I am shopping to buy something new;
  • This article on Zero Waste Fashion, an idea which is slow to catch on in the mainstream fashion industry, but it perhaps something that home crafters and sewers are in a great position to employ;
  • And not far removed from the idea of Zero Waste Fashion is the inspiring work of Sew-Green contributor Lisa Solomon, with her creative side project MODify/d, making use of fashion industry "waste" and transforming it into something beautiful and useful.

November 11, 2010

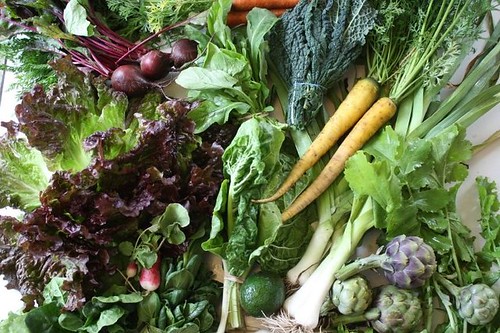
I spent the morning in bed.... weeding.

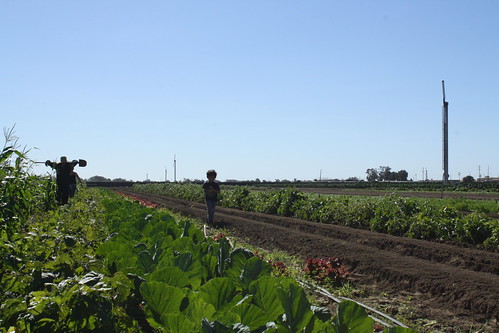
My daughters and I packed up the car early this morning and took the 45 minute drive to our farm.  I like to call it "our farm".  It is in a way.  We are CSA members of a small (5 acre) organic farm in Oxnard, Calilfornia (just outside of Los Angeles).

paradise (with kale)

We have been members of Join the Farm (as "our farm" is known) for almost a year now.  I stumbled upon them quite by accident - during some late night googling for a local organic CSA to try and bring to our neighborhood elementary school.  I hadn't been able to find one as "local" as I wanted - most seemed to be south of Los Angeles, and we live on the northern end. I did not relish the idea of produce being driven through the City to get to us.  I had been doing a lot of reading on food access - and the relationship between the communities our freeways intersect (on which our food is transported) and those same communities access to fresh produce. It was shocking.

As I looked more closely at Join the Farm I learned of their relationship with The Abundant Table Project. The project centers around issues of faith, social justice and sustainability. It sounded like a great fit. I contacted the farm and off we went. Drumming up subscribers in the beginning wasn't easy. We began with a core group of five families - not enough for delivery to our school site. Confident we could build it up we signed on and rotated driving to the next nearest pick-up spot. Soon we had doubled our subscribers and were able to move delivery to our school. (How does your CSA grow?)

CSA (week 6)

At first I struggled with making my way through our weekly box but we are now in a groove, and look forward to unpacking our bounty each week.

I've turned to on-line resources for new recipes, including past CSA posts here on sewgreen. We've built a blog for our subscribers to share what they are doing with their box. We organize visits to "our farm". That is the icing on the cake.

my field of dreams.

Today the girls weeded a bed of purple beans for two hours. Careful to stay in the furrow, they worked quietly and carefully. The only break they took was when they were asked to go check for eggs in the hen house - they took off running. They love it there. They have taken it as theirs without question. And this connection to the soil, to our food, to the people who grow it, to where we live, is more valuable than I imagined.

November 4, 2010

The privilege of biking in the rain


On my drizzly bike ride to work this morning, this sage wisdom occurred to me: If you want to feel like you can conquer anything, take a bike ride in the rain. There’s something about that feeling of perseverance in unpleasant conditions, all with the end result of transportation from Point A to Point B, that just makes me feel virtuous. (I think you would feel even more special if you were in the bike taxi pictured above, though perhaps a bit less virtuous.)

But then I had a second thought. That’s easy for me to say, realizing that I was wearing waterproof pants and jacket, using waterproof panniers to carry my change of clothes and lunch, and riding a nice bike, which I purchased new from my favorite local bike shop.

Perhaps I am not so virtuous after all. I’ve written before about the notion of bike commuting as privilege. It seems strange to think of it that way, but really, bike commuting is relatively easy for me simply because I do have a level of privilege. I don’t have family members requiring child, elder, or illness-related care. I have a level of formal education that has helped me have more opportunities for work, including the ability to choose to work near my home. I don’t have to worry about getting to multiple appointments for services, medical care, or to search for a job. Any of those circumstances could, of course, change in an instant.

And if they did, and I did not have a car, my daily life would become much more complicated. My mid-size city does not have convenient and reliable public transportation. I do utilize the city bus at times, but more than once it has failed to show at the appointed time.

If we are to have communities which truly promote bike commuting for transportation, we have to address the needs of those who don’t have some of the privileges which I enjoy. That includes efficient multimodal transportation, for one thing.

But it also means making safe bikes and bike repairs accessible to everyone. One group in my city, R Community Bikes, has given away over 1,810 bikes this year alone, to help meet the basic transportation needs of those in need. All an individual needs is a signed letter from an employer, doctor, school, church, or social services agency stating why she needs a bike. They also go out to events at communities in need to repair bikes.

Programs like this are a great start, and I would love to hear about other such efforts to make bike commuting accessible to all. Perhaps donations of waterproof gear, or a bike taxi service like the one in Malaysia, floral plastic covering included?

p.s. Cycling in the rain requires some extra care. Here's what the League of American Bicyclist recommends.

September 30, 2010

natural stress relievers

Love Party coop 8
chicken-watching: a very natural stress-reliever

The last few weeks have been kind of stressful.

Job craziness, car troubles, all sorts of unexpected household repairs costing too much money, and lots of sickness in our house: it has all added up to way too much stress.

So I'm taking advantage of the fact that it's my turn to write a Sew Green post to give some thought to natural & sustainable ways to relieve stress. Perhaps it will help me chill out a bit.

When I'm stressed out, I am much more likely to do things that are awfully bad for the environment, like eating junk food and buying stuff I don't need. Driving instead of taking the time to bike where I'm going. Stuff like that. Just noticing that sometimes helps me to avoid doing those things. So what are the really positive things I can do to relieve stress? I'm going to make a list. And I really want to see what you all have to add to the list!

yoga
I love yoga. If I don't get to class every week, I really miss it. Yoga works out the kinks in my body and my mind. When I'm crazy busy, I don't make time for yoga at home. But if I can force myself to make a quiet space for a few minutes for a bit of practice, it helps so much. When I can hardly make myself do it (which is often), I like to use these short (15-20 minutes) streaming yoga videos from YogaJournal.com to guide me through a nice little practice.

cooking a meal
Cooking healthy food is one of the first things out the window when I'm feeling stressed and busy. But I also find that it's a great way to break the cycle, force myself to stop and do something wonderful that takes a little time and is good for me. Plus, if you're craving comfort food, making it yourself can be doubly relaxing.

reading
Nothing transports me to my happy place like a good novel. I sometimes find myself desperately racking our bookshelves for a new book to read when things get tough. I love to lose myself in another reality. And I find that reading before bed really helps me to fall asleep quickly and to sleep peacefully (if I can put my book down). Which brings me to...

sleep
Oh my gosh, what could be better than sleep?? I am an 8-hours-a-night kind of gal, but unfortunately my life is more like 7-hours-if-I'm-lucky. Nothing compounds my stress like sleep deprivation. The best thing I can do for myself is to go to bed early (preferably with a good book to help me off to dreamland).

exercise
Like most people, I need a little exercise every day to help me relax and sleep well. Whenever I start to feel really anxious and full of nervous energy that won't let me rest, it's a sure symptom of not-enough-exercise. The best thing I can do for myself in that situation is to drop everything and go for a long bike ride or a sweaty yoga practice.

time with friends
Today I attended a really frustrating and stressful conference. Luckily I had carpooled with a friend, and just venting together on the ride home helped so much. It helped even more that afterwards I went by her house and had a beer with her family in the backyard. We laughed and watched their chickens scratch around and generally chilled out for a little while. It wasn't a long time, but it sure was therapeutic.

So that's my list. I'd love to hear what some of your strategies are for letting go of stress! Now I think I'll go practice a few downward-dogs.

September 26, 2010

slow clothes


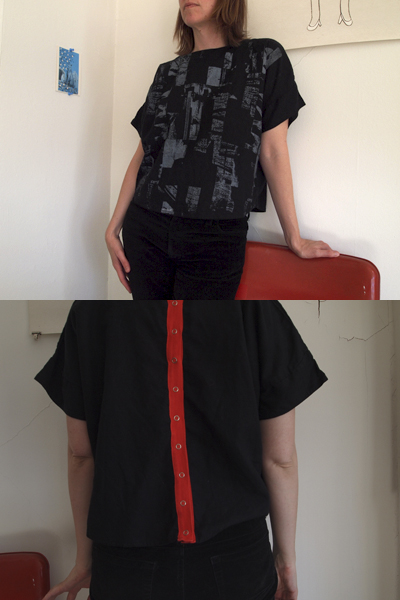
My clothes are disintegrating. Most are over ten years old. Moths have taken advantage of some of them as the clothes have hung on the line to dry. I’ve come to dislike shopping for clothes, even if I appreciate beautiful patterns, textures, cuts. I no longer get a consumer high if I buy a shirt from H+M. The last three years, I’ve bought almost no clothing (save bras and bathing suits) from big or corporate stores. But I’m finding it hard to find hand made, well crafted clothing that I like, even in DIY San Francisco. And I just would rather spend my money on a good cheese. But it is time to start replacing my beyond mending clothing. So my plan is to slowly build a long lasting wardrobe, one well crafted, ideally sustainably sourced/made garment at a time—one item a month.

Above is the first shirt I purchased under my slow clothing plan. The shoulder line isn’t flattering on me, but I really like the print, the red stripe down the back, the feel of the fabric and the company. Seems like the designer is thinking deeply about what she’s making and how it’s being produced—she’s a craftsperson.

Recently I read The Hidden Wound (1968–69 and afterword in 1988) by Wendell Berry, in which Berry writes a bit about craftspeople, though the book is primarily about race and community in the US. (Berry writes about his own experiences as a white boy growing up around black workers/friends on his family’s farm and about how those early experiences continue to inform his thinking about race relations and much more. The book sparks a lot of thought.) Here is the passage about craft:

The industrial laborer subserves an economic idea instituted in machines and in mechanized procedures. This is as far as possible from the work of the traditional craftsman or artist, whose making has never resembled what we now call “manufacture,” but is a cooperation and conversation of mind and body and idea and material. The true craftsman does not waste materials because his or her art involves respect for materials. And the craftsman’s products are not wasted because by their quality and durability they earn respect.
...
The great enemy of freedom is the alignment of political power with wealth. This alignment destroys the commonwealth—that is, the natural wealth of localities and the local economies of household, neighborhood, and community—and so destroys democracy, of which the commonwealth is the foundation and the practical means. This happens—it is happening—because the alignment of wealth and power permits economic value to overturn value of any other kind.

He goes on to mention what government could do to promote the improvement of communities and protection of the natural world. And since the government will not do what it takes—will not dissociate from corporate power—it will eventually come down to us to restore community life.

From reading the above bits, I think about how sitting in front of a computer all day at work (which, in the interest of full disclosure, for me is a place with altruistic intentions whose work is funded in large part by corporations) I miss that cooperation and conversation of mind and body and idea and material. My body tells me this regularly. It wants to move around more. My hands want to build and shape and fit, not just click. I think about how the powerful food industries block regulation and information that would (among other things) improve food safety, and about how most consumers only count the monetary cost of food (instead of also considering the toll of industrial ag on people and land ). I think about how as the climate crisis snowballs (bringing storms and food and water scarcity), we will be forced to rely on our communities, our local farmers. our craftspeople and friends. I think about how the erosion of our communities and the misuse of nature (through natural resources depletion, industrialism, pollution, “free” trade) is largely what brought on climate change in the first place.

So yeah, slow clothes in addition to slow food.

September 9, 2010

The 3 Rs - Part 2

Way back in June, I posted about the first R - reducing. A week later, our garage was broken into and my very nice Norco Vermont was stolen. The kicker was, we had made the momentous decision to take our car off the road only 6 weeks earlier. I was now totally without wheels.

I had a good cry, called the police to report the theft, and then started surfing around on Kijiji and Craigslist to see if anyone might be dumb enough to try and sell my bike there. No luck.

So what's a girl to do?

In my case, get incredibly nostalgic and buy a 1970s Sekine 10-speed that is the exact same bike I had as a teenager. I need the bike for commuting, not for racing, so I immediately headed over to the Orioles Bike Cage and with the help of the lovely volunteers I swapped our the handlebars and brakes. Then I headed to my friendly local bike shop for some new tires, rack and handle grips, and my sweet new ride was ready to hit the streets.

Orioles Bike Cage is the most amazing place. It is all about the second R - reuse. It is located behind the community centre in a building that was formerly the shop / office at the wading pool. The wading pool is now the velodrome (20 laps = 1 km) and the building is full of assorted parts and tools. On the afternoon that I was there, there was also an assortment of people hard at work on an assortment of bikes.

I live in the inner city and the bike cage is my neighbourhood encapsulated. Wayne is an older guy of indeterminate age with a grey handlebar moustache. We chatted amiably about the gang house next to his house, and how glad he is that they've finally moved on. Tim, the young guy helping me, doesn't live in the area, but he is a bike enthusiast and is there to share his skills and spread the love. Jacob is a 10-ish First Nations kid who clearly lives at the Bike Cage, since he's been there every time I have been. He's fearless and independent and totally into his BMX (though he's saving up for a skateboard).  There is a pixie-faced hippy chick who clearly knows her way around a bike and is restoring a gorgeous red cruiser from the '40s or '50s. There is a Filipino guy with his two little kids building a bike from the frame up. A big dude who looks like he rocked out in the '80s (and is still rockin') is doing the same thing. An older woman who didn't speak English very well is waiting for help with her flat tire.

I'm sure everyone is there for different reasons, but lack of money is definitely one of them. The Bike Cage takes money out of the equation. There, with a little work, anyone can have a bike.

Just in case you couldn't tell, let me say it: I LOVE the Bike Cage. And I love my new old bike as well.

September 2, 2010

Better Back-to-School Shopping

I've had a bad morning. My USB memory stick is broken. And I don't just mean "error message" broken, I mean the circuit board has snapped from the plug. It was my fault, I forgot to take it out of the port last night (it was in the back of my laptop instead of the side, as I had another device plugged in its usual spot), and at some point between then and turning my laptop on I must have knocked it. I admit that I cried a little when I saw what I'd done. Luckily in this age of facebook and flickr, it's not the end of the world... just a major inconvenience and a little sad.

But this had a strange sort-of relevance to what I want to show you today. It's that dreaded time of year, and just hearing the words used to send shivers down my spine -- it's Back to School time. Actually, it still does send shivers down my spine, and every year the shops seem to put up those awful banners earlier and earlier. This year, they went up weeks before the end of term! Of course, I always found that going back to school had some advantages -- new pencil case, for example. New book bag. New lunch box. And these days, new USB drives too. It must be a huge money-maker for the high street, but why give up your money for the same old mass produced school wares when you can buy all this stuff handmade, eco friendly and vintage? What an easy way to stand out from the crowd. So I've compiled a small collection of my favourite back to school finds from Etsy - click each image to see more:

(Oh, and check out this simple bookbinding tutorial if you feel like making your own notebook!)


The Highlander VERTICAL bag by Kibber, $99 USD


Organic Linen Messenger Bag by 11m2, $89 USD

Reusable Organic Snack Bag by BebelooshMini, $6.99 USD

I Love Book Zipper Pouch by kukubee, $12 USD

4GB Lego Brick USB Flash by 123smile, $59.95 USD

Blue Octopus Bookplates by boygirlparty, $4.50 USD

Set of 16 Stickers, Creatures Collection by paperexploits, $4 USD

Emerald Lepus Mini Sketchbook by deermayor, $8.50 USD

You should also check out Dawanda, Folksy, and Misi for indie handmade treasures from my side of the pond. (:

Have you found any drool-worthy back to school treats?

August 31, 2010

Island SummeRRR

my girls and i are blessed with the opportunity to spend our summers up at our family cottage. my husband comes for as long as work allows - and my mom joins us when she can. the cottage is located on galiano island, part of the gulf islands, off the west coast of Canada. it is a summer we spend as a tight family unit. a summer without television, reliable cel phone reception, sporadic internet access (only when we go into "town"), and living with the idea of creating as little trash as possible.

galiano island (roughly the size of the island of manhattan, with a permanent population of 1200 people, that blooms in the summer with tourists and cottage dwellers) does not have a landfill. any trash must be taken off island - whether through a service, or (as we do) by your own hand. the first time we visited the island - when my eldest was barely one - we rented a small cottage without laundry facilities, and with no laundromat on the island (water conservation is another big issue here)we were stuck with disposable diapers. i will never forget driving off island with a trash bag of diapers tied to the top of our minivan. (it felt like a drive of shame.)  now we have laundry access and work hard not to use anything disposable. cloth napkins, handkerchiefs and rags abound. my diva cup is ready when that time arrives. and the compost pile accepts all of our food waste. (we are lucky there are no real predators on the island, so do not have to concern ourselves with inviting unwelcome visitors with meat scraps.)

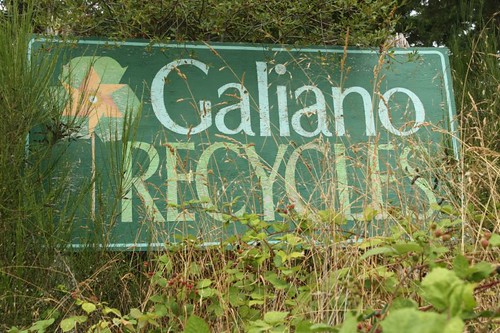
what the sign says.

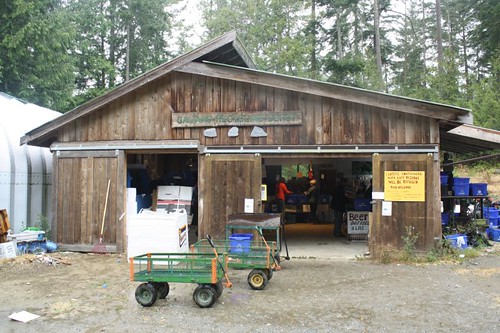
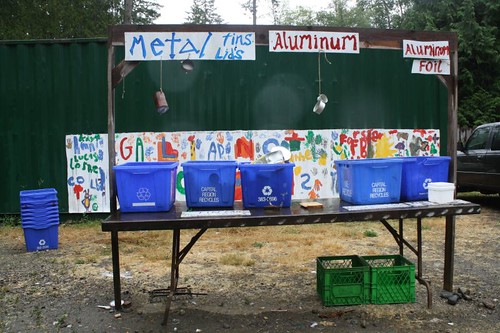
what we do produce can usually be recycled and the island's innovative, and extensive recycling facility. GIRR (Galiano Island Recycling Resources) operates as a non-profit and includes the recycling center and a "free store", as well as a rental service for plastic dish and cutlery sets for large scale entertaining.  Over 100 tonnes of waste are diverted from off-island landfill by the facility each year.  It is reborn as road construction materials, plastics, manufacturing components, tin cans, drink bottles/cans/containers, paper, newspaper and cardboard boxes

Recycling Depot
metals

knowing what we can recycle guides our shopping as well. milk is purchased in glass bottles. bulk items loaded into paper bags. farm-stands and the saturday farmer's market are frequented.  fish is purchased right off the boat.

this year we left with one small shopping bag of trash in the car.

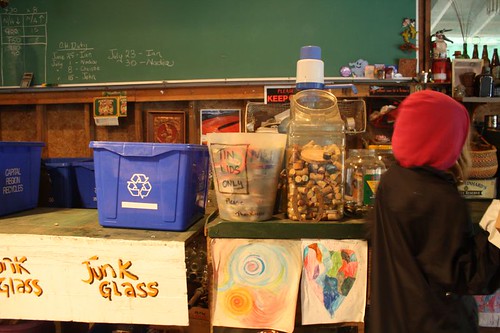
the girls have turned into 3R detectives. they know which plastics can be recycled and which cannot. they know which materials bring the depot money, and which are simply sent off. they love to sort things and navigate the system with ease. it is a skill i believe strongly in, and a big part of developing environmental stewardship.

sorting

these are ideals we are trying to bring home to the city - where it is so much easier to not think about it. we are hoping to establish a more extensive recycling program at our neighbourhood school. i wish LA would get on board. i hear my friends tell of exciting advances in other cities, and think of the impact a change in LA waste management would make. hopefully it will happen before my little stewards of change grow up.

does your school have an innovative recycling program? i would love to learn more...

August 26, 2010

Green Housing: Getting the most out of what you have

 before (currently)

In my architectural day job I work on large projects, mostly University buildings. It might seem like a far cry from designing homes, but I realised recently that a lot of the issues that come up in my work are also relevant to how people might address their housing needs in a more sustainable way- using their (undoubtedly) limited resources in the most effective way to meet their needs. In Australia continually rising housing prices have led many people (ourselves included) to rethink how they use their existing home, instead of buying a different larger one.

Making the best possible use of existing physical resources and materials (Reusing and Recycling) is often better environmentally (and in other ways too) than building new, even if the new building incorporates the latest ‘environmentally friendly’ materials, technology and ‘green building’ design research. I find many of the homes I’ve seen on World’s Greenest Homes appalling, with regards to their consumption of resources and pursuit of brand spanking new, cavernous, luxury, even if they are using some environmentally good materials in a clever way.

I’d like to highlight 5 green building design principles about making the most of what you have already have, and explain how we have been applying them over the last couple of years, as we’ve been renovating and expanding our own home and garden. I'm not claiming that our home is one of the world's greenest, but it is certainly greener than many alternatives.

after (hopefully)

1. Think long term. Our needs always change over time, but it doesn’t make sense to address short term needs in a way that compromises long term needs, or creates a whole lot of wastage or redundant renovations.Think about the big picture master plan, not just the problem that is bugging you today. You may have a toddler now, but will you still be living in this home when they are 10? 20? 30?? (Hmmmm, scary thought...)
With a child entering into our life, we realized we needed a new craft/study room, more living space, and a dining space that could seat more than two people without rearranging the furniture. Fortunately, we had an outside space that was completely underutilized, where we could build two new rooms.

2. How else can you use it? Flexible and adaptable spaces are more useful in the long term than highly specialised spaces. Some rooms have to be single function- the kitchen and bathroom aren’t going make very good bedrooms- but can other rooms be changed around (bed/craft/lounge/dining room) as needs change? Perhaps small changes, like changing doors or windows, removing a wall, adding power points, removing fixed storage, or changing lighting will change how you can use the spaces you already have.
Our rooms aren’t big, but they’re generous enough, with doors in sensible locations, so that they can be used in different ways, with different furniture layouts. We can use our new craft/study room as a bedroom if we need to, as can a future owner.

3. Inside and Outside. Depending on your climate, at different times of the year the spaces outside your home can really expand your living space, and the kinds of things you do. Are you invited out by being able to see and hear what’s happening outside? Is the door in the right spot? Is the space outside at the same level as inside? Is it shady or sunny, sheltered from wind or rain, appropriately paved or decked?
We hardly used our back garden because you had to go through the laundry (which included a toilet) to get there, and immediately down a couple of ugly concrete steps. Not ideal, especially when you have visitors. By building a deck area and installing a new (fully glazed) back door into our kitchen, we now have much more light in our kitchen, can see how lovely the garden is, and spend a lot more time in out there.

4. Collecting water. Where we live, the price of tap water is cheap, so until the government brought in restrictions on how we use it, investing in large rainwater tanks didn’t seem worthwhile. However it’s now our legal option for watering the garden, washing the car or letting our toddler play under the sprinkler. You can also collect rainwater for toilet flushing or laundry, depending on how you set the system up. Rain and grey water collection options vary, depending on local regulations, budget, space and water needs.
We now have two water tanks- one in the front yard and one in the back, to help our efforts to set up a food producing garden and shade trees. We also have a basic grey water system set up so that we can collect bathwater to hand water our small lawn when it needs it.

5. Sun and Shade. The key to keeping a building warm (or cool), without spending money on energy, is letting the sun in (or keeping it out), along with insulating the walls, floors and roof. The potential benefits vary depending on your climate and time of year. There is also energy saving benefit if the daylight means you don’t need to turn the lights on all the time. The location and size of windows, type of glass, and any fixed, movable or growing shade (inside or outside) will all make a difference.
We packed our extension with insulation (the existing house has virtually none, so we do rely on air conditioning to keep us cool upstairs in summer) and installed large windows with special coated glass on the sunny side of the house. A sheer blind reduces glare on sunny winter days. In hotter months, we have a removable fabric sunshade that shades the window and the outside deck. All our shade trees are fast growing and deciduous (sadly not native) which means the garden gets sun in winter, but our lawn is beautifully shaded and cool in summer.

I’ve tried to keep this as a simple outline- something to perhaps get you thinking, and inspire you to investigate further. There are many resources out there for more detailed information on green building design and many of the things I’ve mentioned- too many to pick just a few. I encourage you to Google, or if you’re in Australia on 12th September, it happens to be Sustainable House Day, with many homes, all over the country, open to visitors and all their questions.

August 13, 2010

Make yourself un-stinky!


I have been reading about handmade deodorant for a few years now, but was always a bit skeptical. Each recipe seemed to involve melting stuff, or buying bulk ingredients to use in small amounts- not super practical. I have been off the traditional antiperspirant & deodorant for a long time since it is full of scary stuff like aluminum, phthalates & fragrance [See Secret Wide Solid's rating at Skin Deep] which is liked to neurological problems, cancer and reproductive toxicity. And there is an excessive amount of plastic used for each tube. Instead I used Trader Joe's deodorant which was pretty safe, eco friendly, and cheap. I saw no reason to make things more complicated for myself.


But here's the catch: I loved the Trader Joe's deodorant, and Toms of Maine, and other non-toxic deodorants I have used BUT they don't really work that well. I feel bad saying it, but they quit by the end of the day. I just assumed that was the nature of using non-toxic deodorants and have lived with it for far too long. Until now.

I came across this recipe, from this website and I had all the ingredients in my kitchen already. Plus there was no heating involved. But what really caught my attention was the rave reviews. And I am here to add to those reviews.

Let me say it loud and clear: THIS STUFF WORKS FOR ME. And it works all day, and in to the next. In fact, since I switched, I have not had one single moment of smelliness. Total awesomeness. 

UPDATE: There is an instructional video and FAQ from the og website here: http://www.passionatehomemaking.com/2013/01/homemade-all-natural-deodorant.html


Homemade Amazing Deodorant:
Adapted from Passionate Homemaking

The original recipe calls for either corn starch or arrowroot powder, but since I had both, I used both. Some folks complained about irritation in the comments due to the amount of baking soda- and found that using less helped. I have had no problem with the amount of baking soda so I will continue with these proportions. Also the coconut oil can go from solid to liquid depending on the storage temperature. Mine stays at a perfect semi-solid in my bathroom, and melts to an oil when I rub between my fingers.

5-6 tablespoons coconut oil
1/8 cup arrowroot powder
1/8 cup cornstarch
1/4 cup baking soda
Several drops of bergamot oil [optional]

Mix the powders together in a jar and slowly add the coconut oil until you have a "pomade" consistency and powders are mostly dissolved. Add a few drops of oil until it has a lovely hint of scent.


To use, scoop out a pea sized amount and rub between your fingers to melt and create a smooth texture. Apply under your arms and rub any left into your hands as a moisturizer.

Since the coconut oil changes rapidly from a solid to a liquid I would not recommend trying to use a traditional deodorant "stick" but rather to scoop from the jar.

If you are at all hesitant about making your own, this is the recipe that will win you over! Non toxic, plastic free, sustainable, and extremely effective. Total win-win.

Cheers!

EDIT:
I would like to answer some questions from the  comments.  Please note that I am not a deodorant expert in anyway.  I found this recipe on the internet and have been using it for 3+ years.  I am just sharing & reviewing my experience with the recipe.  Click the links above for the original recipe and read through the comments for more information.

Does the coconut oil cause oily stains on your clothes? 
I haven't had any problems with staining.  Test it out on an old shirt and let it dry first if you are nervous.

Just for clarification, this is just a deodorant, not an antiperspirant, right?
Yes, this is more of a deodorant than an antiperspirant BUT I have noticed considerably less sweating? It might be the corn starch or baking soda? Or just my body since I haven't used antiperspirant in 10 years and don't notice sweating that much anymore.

I am allergic to coconut so I was wondering what could be substituted for coconut oil?
For oil substitute? I don't know. Something shelf stable? Coconut oil is stable, anti-fugal and anti-bacterial which is why it works. Other homemade deodorant recipes use Shea butter- you might want to find a different recipe. 

I really want to try this but I can't find arrowroot anywhere. Was wandering if maybe tapioca starch or anything else could be substituted?
You can find arrowroot in the spice section of the grocery stores.  See jar pictured above.  Other stores may have it in the baking section.  Not sure about tapioca- but you can sub with corn starch.  

We don`t want her using all that chemical on her. Has anyone used this for kids?
I have not tried this on a kid. I would test a small patch first for irritation. The baking soda can be harsh. 

AND, I have one. I absolutely cannot stand Coconut. I even gag with the smell. I wish I wasn't like that, but I am.  What can I substitute? Someone, Please help. :)
For oil substitute? I don't know. Something shelf stable? Coconut oil is stable, anti-fugal and anti-bacterial which is why it works. Some refined coconut oils do not smell like coconut- those might be your best bet. Other homemade deodorant recipes use Shea butter- you might want to find a different recipe. 

You know your body best and can figure out what works for you. 

UPDATE: There is an instructional video and FAQ from the og website here: http://www.passionatehomemaking.com/2013/01/homemade-all-natural-deodorant.html

August 5, 2010

latest finds for kids


once my daughter was born, i knew better than to swear that i wasn't going to have ANY plastic toys in my house. but i did really want to keep from buying cheap plastic toys as much as possible. i was grateful for all the hand me down items that were given to us [which have since been handed down again]. and i scoured craigs list and freecyle and berkeley parents network for items that i thought we could use. [btw - berkeley parents network is a GREAT resource. it's full of information on parenting and tips on bay area businesses, etc. you have to be in the bay area to sign up for their lists, but anyone can browse the site for info. i wonder if other communities have similar networks set up? if you know of any leave the info in the comments?]


i was really happy to discover green toys . they are actually made in california [the state where i live] and are made from recycled plastic milk jugs. you can read more about the process here . the thing that i really like about green toys, though, is that they LOOK nice too. i have to admit that looks are important to me. especially since toys are going to get left lying around. i might as well find the objects strewn about my living room aesthetically pleasing to look at right?


i was able to find a shop locally that carried the toys so i went and checked them out in person. they look and FEEL nice. my daughter is still a bit young for most of their toys, but i definitely will be getting some for her in the future.

green toys has their own online shop, or here's a list of stores that also carries their stuff.


the other thing i found were these stainless steel drinking straws. my daughter has just discovered the joys of drinking from a straw. i happened to have a very old box of plastic straws around that we've been going through, but i really didn't want to have to buy a new box of straws. so wasteful. and i certainly didn't want to try and explain to an 18 month old that we couldn't use a straw because they were bad for the environment. nor did i want to try and find BPA free plastic straws [somehow the thought of trying to keep a plastic straw clean didn't really work for me]. but stainless? these i like! the only bummer was that i couldn't find any locally to buy, so i gave in and purchased some from amazon .

and so goes my recent adventures in green shopping for the little. not as cool or green as re-making bibs into handy wipes, but it's what i got !

July 29, 2010

News!


Hi there,

Usually my Sew Green posts are reviews of books—and generally those books are about sustainable agriculture. But today I'm posting about an anthology related to sustainable agriculture that I compiled and designed!

Unlike the authors of the books I've reviewed, I'm not a scientific expert, journalist, or an acclaimed writer. So instead I designed a book that is a cross between a coffee table book (filled with delicious images) and a collection of poetry and creative non-fiction.

From Orchards, Fields, and Gardens features writing from 11 authors, and photos and illustrations from 21 artists. The authors remember activities, people, and places that shape(d) their appreciation for small scale food production and processing. (Sew Green's own bugheart has both writing and photos in the book.)

From Orchards, Fields, and Gardens: Art and rememberings celebrating sustainable agriculture and good food will be back from the printer mid-August! Until then, you can pre-order the book and get $4 off of the regular price.

I hope you like it!


July 16, 2010

my dog has fleas.

and I cannot bear the thought of a chemical treatment. At least until I've exhausted other options.

What should I do? Well of course turn to you for advice!

corbin palms campout 2010

I am thinking she must have picked them up at the beach. Or from a walk in the neighbourhood. Temperatures here have hit the triple digits so I am thinking that may contribute to it. (Though I may be wrong.) In any case - how do I get rid of them (short of picking them off by hand and drowning them...) and how do I prevent them from coming back?

Thank you!

July 8, 2010

turn old bibs into new wipes

bibs to wipes 1

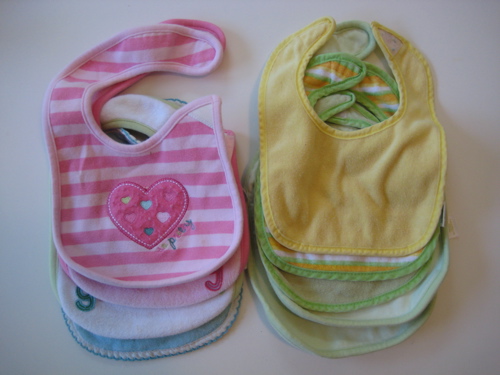
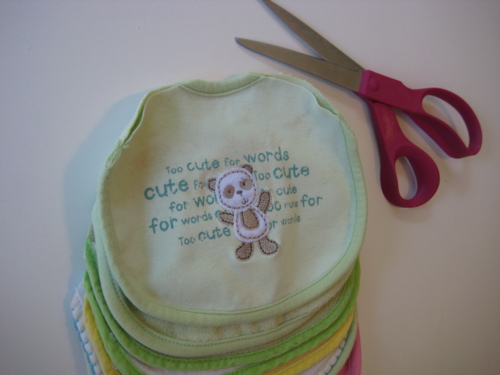
We have a large basket of well-used bibs at our house. Many of them were hand-me-downs and have kept many a baby and toddler from besmirching their finery over the years. Quite a few of them have been plain old worn out, with velcro that somehow lost its stick, and years' worth of baby food stains that will never wash out.

I hate throwing away useful things, especially baby things which seem to cost so much and function for so short a time. I debated a while about simply sewing new velcro onto these bibs, but the stains on many are so icky (and we have a mountain of bibs that do work), that I decided to make them into wipes instead. You can never have enough wipes, and I feel guilty every time I use a disposable one.

This is a ridiculously easy project. Here's how I made mine:

bibs to wipes 2

1. Cut the tabs off the bibs. I trimmed mine into a pleasing symmetrical shape (symmetry is optional).

bibs to wipes 3

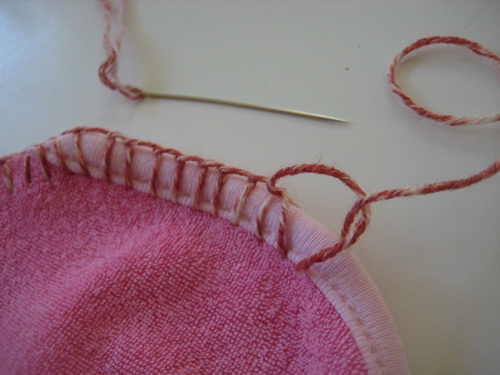
2. Use a decorative stitch around the outside edge to finish the raw edges and make the whole thing look nice. I used mattress stitch. Be sure to use a sharp embroidery needle and a lightweight cotton yarn or crochet thread (mine was leftover cotton sock yarn).

bibs to wipes 4

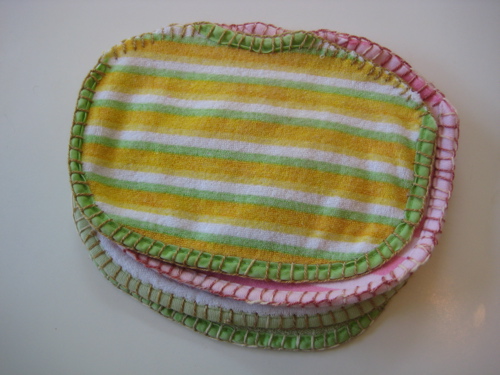
Voila! Two steps and you've got a tidy pile of re-usable baby wipes, kitchen rags, burp cloths, or washcloths - already pre-stained so you don't need to feel bad about getting them good and dirty.

p.s. Those more adept at sewing than I am could remove the original piping from the discarded part of the bib and trim out the raw edges with that, eliminating the need for the fancy hand-stitching. Totally up to you!

June 30, 2010

Garbage-less Lunches

I may write a whole lot about food over at my other blog (It Ain't Meat, Babe), but I don't get much of a chance to write about how that food gets eaten. I usually leave that up to my readers. But personally, despite spending most of my time thinking about how the food gets prepared, I also have some systems in place for how it gets eaten.

First let me tell you that my day job necessitates a lot of travel. A LOT! I am rarely in my office. Some days I am working in rural communities two hours out of the city. Some days I'm in some far-flung suburb. Occasionally I am lucky enough to be working somewhere within walking or biking distance. As a result of this, I've become very good at packing a lunch. I know it's usually the most cost-effective and environmentally friendly thing to do. Not to mention the fact that vegan food is hard to come by in most places, especially if I'm looking for a quick lunch to eat while I'm traveling.

So I pack my lunch. But what do I pack it in?


Over my many years of lunch-bringing, I've figured out how to make everything involved with my lunch reusable. Lots of schools have garbage-less lunch programs in place, I figured why not have a one-woman garbage-less lunch policy in place for myself?

My first step was to find some glass containers with good lids. I try to use as little plastic as possible, period. Although we have no microwave at home, I do sometimes use one when I'm lunching elsewhere and I am loathe to microwave any of my food in a plastic container. (Why fuss around trying to figure out if one container or another is "microwave safe" when you can just avoid the potential danger all together?)

So far, in our house, we've tried three different kinds of glass containers (all have plastic lids). The little round one in the photo above is made by Anchor. We have larger versions as well and I have to say that they are the clear winners. They are union-made in the United States and they are reasonably priced, widely available, and oven safe. The lids fit tightly, even after a few dishwasher washings. They aren't completely leak-proof, but they aren't too bad if the food inside isn't too liquidy.

The other container in the photo is made by Pyrex and it is my least favourite of our three varieties. The sizes are kind of awkward, and the lids are freakishly tight at first and then loosen a lot when washed in the dishwasher. Though I must say, looking at their website it seems they've introduced a line of containers with "No-Leak Lids". I'd be anxious to give those a try.

My other favourite is the Glasslock containers (not pictured). The lids are almost completely leak-proof (why "almost"? Well, let's just say my purse smells a bit more like curried cauliflower than I'd like it too. However, my boss brings soup in one of these containers everyday and her briefcase is unscathed, so I may just have a slightly wonky specimen.) These are a little heavier than the Anchor containers and some of them are labelled "not safe for oven". They are also made in the U.S.A.


The other lunch item I never leave home without is my homemade cutlery holder. If you can sew in a straight line, you can make one of these. All it is, is a rectangle of fabric, folded over on one end with stitches making sections of the fork, knife, spoon, and napkin. I added a ribbon to one end so that after I fold down the top flap and roll it up, I can tie it closed. Some spare cutlery from a secondhand store and a cute cotton napkin complete the project. It doubles as a placemat if you want to be fancy. And at the end of the week you can throw it in the washer. I like it so much I'm slowly making similar ones for all my coworkers.

And last, but not least, (though totally unrelated to lunches, at least right now) I wanted to give you all a garden update. You may remember my last post about getting over my fear of starting seedlings from scratch. Well, get a load of those little seedings now:


They're big, healthy tomato plants! Growing happily in the garden. I can't wait until harvest time.

J.